SCCM Script – Uninstall McAfee

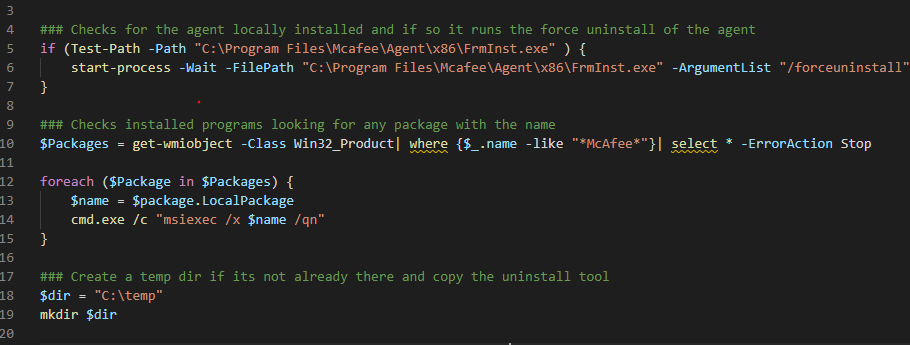
Here is a short but effective script to be run out of SCCM to completely uninstall McAfee from a device. Obviously EPO will do the same thing but usually you have to wait for the agents to check in. This script is great for those pilot users or systems that just aren’t playing nice. The script will first check to see if the EPO agent is installed and if so it will run the agent force uninstall. Next, it will run through add/remove programs and uninstalls anything with “McAfee” in the title. Finally, it copies the McAfee Endpoint product removal tool which removes anything left over, then reboots. I cannot supply the McAfee Endpoint product removal tool. However, if you have EPO already you can download the tool from McAfee for free. Due to this, you will need to update the hash value in the if statement otherwise the tools will not run. You can remove the if statement if you wish. Although, I highly recommend you always hash any files you are copying in your scripts. In my experience, has been the sledgehammer to uninstall McAfee. I hope it helps!

### Checks for the agent locally installed and if so it runs the force uninstall of the agent
if (Test-Path -Path "C:\Program Files\Mcafee\Agent\x86\FrmInst.exe" ) {
    start-process -Wait -FilePath "C:\Program Files\Mcafee\Agent\x86\FrmInst.exe" -ArgumentList "/forceuninstall"
}

### Checks installed programs looking for any package with the name 
$Packages = get-wmiobject -Class Win32_Product| where {$_.name -like "*McAfee*"}| select * -ErrorAction Stop

foreach ($Package in $Packages) {
    $name = $package.LocalPackage        
    cmd.exe /c "msiexec /x $name /qn"        
}

### Create a temp dir if its not already there and copy the uninstall tool 
$dir = "C:\temp"
mkdir $dir

### Copy McAfee Endpoint product removal tool to the local PC
robocopy "\\Path\to\Source\Folder"  "C:\temp" "McAfeeEndpointProductRemoval_20.11.0.111.exe"

#Get hash value of the file we just copied... JUUUUST in case
$hash_value = Get-FileHash -Path "C:\temp\McAfeeEndpointProductRemoval_20.11.0.111.exe"

#Compare the hash value and only run the exe if they match.  
if ($hash_value -eq "4690CFDD6C9557EBA62D079255A14A3416F1BD3E91237D1259126837274949BF") {

    #Run the uninstall silently
    Start-Process -FilePath "C:\temp\McAfeeEndpointProductRemoval_20.11.0.111.exe" -Wait -ArgumentList "--accepteula --ALL"

  
}

#Remove the uninstall tool since we are done with it
Remove-Item -Path "C:\temp\McAfeeEndpointProductRemoval_20.11.0.111.exe" -Force -Confirm:$false

Tagged : / /

Backup and restore DHCP with Powershell

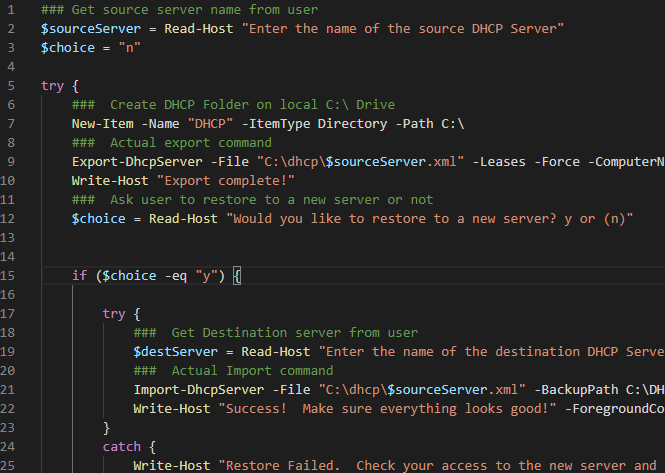
This is a helpful script for migrating from one DHCP server to another. With this, you can backup and restore DHCP with powershell. Run this script from a Domain controller or any other system that you are logged in as Domain Admin. When you run the script it will ask you the name of the source DHCP server. The leases and scopes from that server will be backed up locally on the system you run this from in a folder called DHCP. You will then be asked if you would like to restore. If you say yes, you will be asked what the destination server name is. It will now restore the scopes and leases you backed up earlier to the destination server. After this completes don’t forget to authorize the new server and de authorize the old one.

### Get source server name from user
$sourceServer = Read-Host "Enter the name of the source DHCP Server"
$choice = "n"

try {
    ###  Create DHCP Folder on local C:\ Drive
    New-Item -Name "DHCP" -ItemType Directory -Path C:\
    ###  Actual export command
    Export-DhcpServer -File "C:\dhcp\$sourceServer.xml" -Leases -Force -ComputerName $sourceServer –Verbose -ErrorAction Stop
    Write-Host "Export complete!"
    ###  Ask user to restore to a new server or not
    $choice = Read-Host "Would you like to restore to a new server? y or (n)"


    if ($choice -eq "y") {
        
        try {
            ###  Get Destination server from user
            $destServer = Read-Host "Enter the name of the destination DHCP Server"
            ###  Actual Import command
            Import-DhcpServer -File "C:\dhcp\$sourceServer.xml" -BackupPath C:\DHCP\ -Leases -ScopeOverwrite -Force -ComputerName $destServer –Verbose -ErrorAction Stop
            Write-Host "Success!  Make sure everything looks good!" -ForegroundColor Green
        }
        catch {
            Write-Host "Restore Failed.  Check your access to the new server and make sure DHCP is installed." -ForegroundColor DarkRed
            Exit
        }
    }


}
catch {
    Write-Host "Backup Failed.  Make sure you have access to the server and that you didnt typo the name" -ForegroundColor DarkRed
    Exit
}
Tagged : /

Add local ESXi users

For the most part you can use vCenter and powercli to get almost anything you need done for your virtual environment. However, sometimes you might run into a monitoring or management tool that does not have the ability to talk to vCenter. In this case we need to give the tool a local ESXi account, but we don’t to be handing out root password to automated systems. Adding a local user account can be done through the web ui for each ESXi host. If you have more than a few this could take a while. To solve this we can use our good friend powershell. To do add these users we will need to connect to each host using ssh. I tried just using the built-in ssh that windows/powershell can do but it just didn’t work right. To get over this I used a tool called kitty this is a modified putty that lets you run it from command line. You can use plink as well but I already had kitty available and some code I had written for a different task. Another thing you need before starting is vmware powercli. You can see this post on how to set that up. The code below will connect to vCenter, look for the host(s) we define, then for each of the hosts it will enable ssh via powercli, connect via kitty (ssh) and run our commands to create the user and set read-only permission, finally it will disable ssh.

#Check for Creds and ask for them if they aren't found
if (!($Creds)) {$Creds = get-credential -Message "Enter your vCenter Admin Creds in domain\username format"}

# Connect to vCenter
Connect-VIServer -server yourvCenterIPorName -Credential $creds -force

#get all hosts.  You can use an array here instead, but this will get all of the hosts connected to your vCenter
$esxHosts = Get-VMHost 


foreach ($esxHost in $esxHosts) {
    
    $esxHost = $esxHost.name
    #Start SSH Service
    Get-VMHostService -VMHost $esxHost | Where-Object {$_.Key -eq "TSM-SSH" } | Start-VMHostService

    #run commands to create user and set read-only permissions
.\kitty.exe -kload .\kex.ktx root@$esxHost -pass "ESXiPassword" -cmd '
esxcli system account add -d=''read-only local user'' -i=''username'' -p=''Password'' -c=''Password''
esxcli system permission set -i=''username'' -r=''ReadOnly''
esxcli system permission list
exit
'

    
    #Stop SSH Service
    Get-VMHostService -VMHost $esxHost | Where-Object {$_.Key -eq "TSM-SSH" } | Stop-VMHostService -Confirm:$false


}

Remove a local user

If you need to remove the user we can modify the above script a bit to remove the user from all the hosts. That looks like this:

#Check for Creds and ask for them if they aren't found
if (!($Creds)) {$Creds = get-credential -Message "Enter your vCenter Admin Creds in domain\username format"}

# Connect to vCenter
Connect-VIServer -server yourvCenterIPorName -Credential $creds -force

#get all hosts.  You can use an array here instead, but this will get all of the hosts connected to your vCenter
$esxHosts = Get-VMHost 


foreach ($esxHost in $esxHosts) {
    
    $esxHost = $esxHost.name
    #Start SSH Service
    Get-VMHostService -VMHost $esxHost | Where-Object {$_.Key -eq "TSM-SSH" } | Start-VMHostService

#run commands to remove the user
.\kitty.exe -kload .\kex.ktx root@$esxHost -pass "ESXiPassword" -cmd '
 esxcli system account remove -i=''username''
 exit
 '

   
    #Stop SSH Service
    Get-VMHostService -VMHost $esxHost | Where-Object {$_.Key -eq "TSM-SSH" } | Stop-VMHostService -Confirm:$false


}
Tagged : /

Run Powershell commands on many systems

One of the best things about powershell is the ability to run commands on many systems at once or in a loop. There are a few ways to do this and I’ll go over a few of my favorite in this post. First, We need to get an array filled with the systems that we want to work on.

Fill Array with Systems

This will be used in each of our methods for running commands on systems. Here is how the code looks:

# initialize the array
$systems = @()

$systems = (
     "System1",
     "System2",
     "System3"
)

Multiple PSSessions

First up is the simplest we will use New-PSSession and Invoke-Command. Since we already have our array of systems here is how you create the PSSession to ALL of the systems at once:

#Check for Creds and ask for them if they aren't found
if (!($Creds)) {$creds = get-credential -Message "Enter your Admin Creds"}

# Create PSSessions to all the systems in the array
$sessions = New-PSSession -ComputerName $systems -Credential $Creds

Now that we have our sessions we can run whatever commands we want using invoke-command. Here is an example of running gpupdate on all the systems at once. Whatever you put inside the curly brackets is what will be run on each system. For ease knowing the the heck happened I always put the hostname command first. This just prints the hostname right before the results of the second commands so you can tell if the command worked on each system. You can string multiple commands together with the semi-colon (;).

Invoke-Command -Session $sessions -ScriptBlock {hostname;gpupdate /force /boot}

Foreach loop

Depending on the command you are running maybe you don’t want all the systems to run the command at the same time. You can accomplish this with a foreach loop. We will still use invoke-command, but the commands will run one system at a time. We will run the same gpupdate command. Here is how that code looks:

foreach ($system in $systems){
     Invoke-Command -Computername $system -ScriptBlock {hostname; gpupdate /force /boot}
}

Foreach-Object loop (PS 7+ only)

Starting in Powershell 7 we have a new way to run for loops. We can run them in a mode called parallel. Instead of the old school for loop that runs one iteration at a time, it will run multiple iterations at once. You can even throttle it to say run 2 or three at once. This is my favorite loop type for sure. I mention the throttle because depending on the command you are trying to run if you have too many threads running at once its actually slower than a traditional for loop. Crazy right? You will see it as you use it more, but for the most part you can let it rip and its waaay faster than waiting on a regular loop. Here is how it looks with the same command we have been using:

$systems | ForEach-Object -Parallel  {
     Invoke-Command -Computername $_ -ScriptBlock {hostname; gpupdate /force /boot}
}

Notice that we use the $_ for the computer name. This is how you access the array one item at a time in this type of loop.

Tagged :

Read text from a PDF with Powershell

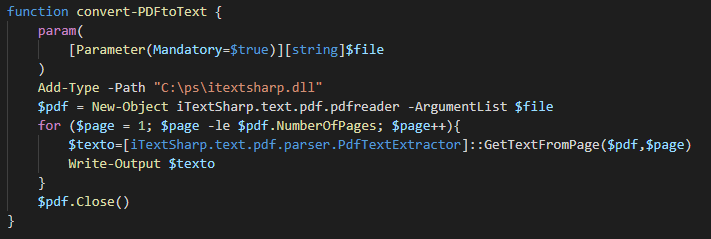
The other day I helped a co worker with a script he was working on. He needed to read text from a PDF with Powershell. I had done this in the past with autoit but that wasn’t going to be an option this time. There are a lot of posts about this online but they almost all lead to itext7 I don’t if my co worker and I are just dumb but we just could not get their module installed. I did end up finding a different way to get this done. You really just need this DLL that has the library to deal with PDF files. I cant upload it here but you can get it easily.

Get DLL

You can download the .DLL file from this site (UPDATE 10-19-21: the original .dll is no longer at the original link. Another commenter pointed out its on github here also I created a share link for the .dll I use for this and I know this one works. That link is here) . When you get to the site click the “Download Archive” button. This will give you a zip file. Extract it, inside the folder open sourceCode, Main, Libraries. There you will find itextsharp.dll. Copy this file to C:\PS\ (this is where our script will look).

Read text from PDF file

I made this into a function so it is easy to use in a larger script. here it is:

function convert-PDFtoText {
	param(
		[Parameter(Mandatory=$true)][string]$file
	)	
	Add-Type -Path "C:\ps\itextsharp.dll"
	$pdf = New-Object iTextSharp.text.pdf.pdfreader -ArgumentList $file
	for ($page = 1; $page -le $pdf.NumberOfPages; $page++){
		$text=[iTextSharp.text.pdf.parser.PdfTextExtractor]::GetTextFromPage($pdf,$page)
		Write-Output $text
	}	
	$pdf.Close()
}

This is is an example of how to run it and display the results to the screen.

$file = "C:\Path\To\PDF.pdf"

convert-PDFtoText $file

With this example we set the text into a variable for later use.

$file = "C:\Path\To\PDF.pdf"
$text = convert-PDFtoText $file
Tagged :

Use DeskDock and Wireless ADB to control your phone from your PC wirelessly

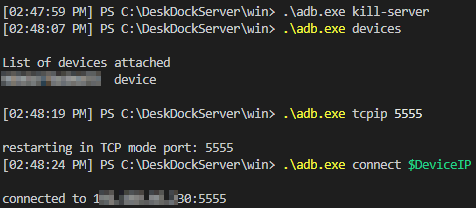
Today I want to show you how to use DeskDock to control your phone from your desktop….WIRELESSLY. I have been using DeskDock for a while now and I love it. I don’t love that I have to keep my phone plugged in all day to use it though. Today I had a revelation that, frankly, took way too long to happen. DeskDock simply uses ADB commands to control your phone, and ADB CAN work wirelessly. So, I gave it a shot and surprisingly it just worked. I already had DeskDock up and running but I’ll give a quick overview and links to the process. At the end I will share my script to automate the daily setup part.

Install DeskDock

Setting DeskDock up is pretty easy. You download the server program onto your PC and run it. On your Android phone you enable Developer mode and usb debugging, next download the app, run it, then plug in your usb cable. The main thing on the server side (your PC) is to make sure you have the right ADB drivers for your phone. I have a Pixel so I used this link. Also, here is the link to the setup from the developer of Deskdock.

PC (server) side setup

The only two prep-work we need to do is install Java (if you don’t already have it) and the ADB drivers for you phone.

Install Java
You can install java from their website or if you have Chocolatey you can simply run

choco install jre8 -y

Install ADB USB Driver
Installing ADB drivers is pretty easy as well, its really just about downloading the right one. I have a Pixel so I used the one here but if you have another type of phone you should find the right drivers in this list.

Download and run the server app
Download the latest server app from here. Place the folder on the C:\ drive and rename it to DeskDockServer (no version number). You don’t need to put it on the C:\ drive if you just want to use DeskDock with a USB cable, BUT if you want to use my script you do. Now go into that folder and right click on the DeskDockServer.exe and hover over send to and click Desktop (create Shortcut). We will use this shortcut in the next step. Next, to get this to autostart we will add it to our startup folder. From the Run prompt (or cmd or pwsh) type in shell:startup and hit enter. This will open up your startup folder in explorer. Now copy or cut the shortcut we just made on the desktop into this folder. Now, every time you login DeskDock will autostart. Go ahead and double click our new shortcut to start the server this time for our next steps.

Phone Side setup

For our phone setup we need to do a few things; Enable Developer mode, enable usb debugging and make sure wireless adb is enabled.

Enable Developer Mode
Enabling developer mode on android is pretty easy as well. Just go into settings, about phone and then tap your build number 8 times. This will enable the developer mode options.

Enable USB Debugging
Next we need to enable usb debugging. Do this from System, Advanced, Developer Options. Scroll down until you see USB Debugging and toggle it to on. After you do this step you can actually start using DeskDock, but with a usb cable only. If you want to NOT have to plug in every time you can enable wireless adb and that will allow you to control your phone without plugging in.

Enable Wireless ADB

Wireless ADB will kill itself when your phone reboots. You will need to do this step every time you reboot your phone. This is the manual way. Later in this post I will share a script that does this for us. To do this manually open an admin powershell window and path to the deskdock folder. If you followed my advice above it will be at c:\ so the command would be:

cd C:\DeskDockServer\win\

Lets check to see that the device is connected

.\adb.exe devices

This should return your devices as what looks like a serial number (see below image for all commands)

Run the following command to enable wireless adb. You CAN change the port but I recommend against it. If you plan on using Tasker for anything extra fancy it needs to be port 5555:

.\adb.exe tcpip 5555

This will just return “restarting in TCP mode port: 5555”

Next is to make the connection. The first time you do this you will get a permission prompt pop-up on your phone. Make sure you check the box that says always allow or you will need to accept each time. Replace $DeviceIP with the IP address of your phone. You can get it from the advanced section in the wireless menu. In the script later on I have a way to get it without looking at your phone settings.

.\adb.exe connect $DeviceIP

You are now connected to your phone and can control it with DeskDock wirelessly.

Script to Enable Wireless ADB and connect to phone

I was excited to get this working but I quickly realized what a pain this was going to be every morning. Before using DeskDock wirelessly I would come into work, boot my PC, open the DeskDock app on my phone, then plug in the USB cable (sometimes a few times!) and I and i would be off to the races. Now I need to open a powershell window and run a few commands each time and I have to make sure my IP didn’t change too. Boo! Enter powershell. I made a quick script that will do these things for us! This code is pretty short and I commented it like crazy so you should be able to follow along pretty easily. I made this in to an .exe as well that I put in my shell:startup folder so it starts up with my PC. It wont let me host exe files though so I will figure out how to do that and update the post. for now here is the powershell code:

### Make sure powerhsell is loaded as admin
if (!([Security.Principal.WindowsPrincipal][Security.Principal.WindowsIdentity]::GetCurrent()).IsInRole([Security.Principal.WindowsBuiltInRole] "Administrator")) { Start-Process powershell.exe "-NoProfile -ExecutionPolicy Bypass -File `"$PSCommandPath`"" -Verb RunAs; exit }
### Load in the ability to make messagebox windows
Add-Type -AssemblyName PresentationCore,PresentationFramework

### Path to our Deskdock Dir that has ADB in it
cd C:\DeskDockServer\win

### Kill any existing instances of ADB server
.\adb.exe kill-server

### This makes a message box telling the user to plug in their device. 
### We need to plug the device in this first time to enable wireless ADB 
### as well as to get the IP address of the device so we can make our connection
[System.Windows.MessageBox]::Show('Plug the phone in now and click OK')
$IPmess = .\adb.exe shell ip route
$IPCleaner = $IPmess.Split(" ")
$IPIndex = $IPCleaner.count - 2
$DeviceIP = $IPCleaner[$IPIndex]
.\adb.exe tcpip 5555
.\adb.exe connect $DeviceIP
[System.Windows.MessageBox]::Show('Should be ok to unplug now')

### Device should be connected at this point.  The below is just a look to kill and restart
### the adb server if your device goes off the network.  When the device comes back the script
### will try to reconnect the device. 
$DeviceConnect = $true
$pigs = "Flying"
while ($pigs -eq "Flying") {
    
    # $TestConnection = Test-NetConnection -ComputerName $DeviceIP -Port 5555 | select -ExpandProperty TcpTestSucceeded
    $TestConnection = .\adb.exe devices

    if ($TestConnection[1]) {
        Start-Sleep -Seconds 10
        Write-Host "connected"
    }
    else {
        
        .\adb.exe kill-server
        $ping = $false
        while ($ping -eq "False") {
            $ping = Test-NetConnection -ComputerName $DeviceIP | select -ExpandProperty TcpTestSucceeded
            Start-Sleep -Seconds 10
            .\adb.exe kill-server
        }
        .\adb.exe connect $DeviceIP
    }
}

Tagged : /

Create Azure vnet, subnet and Network security group with application policies with powershell

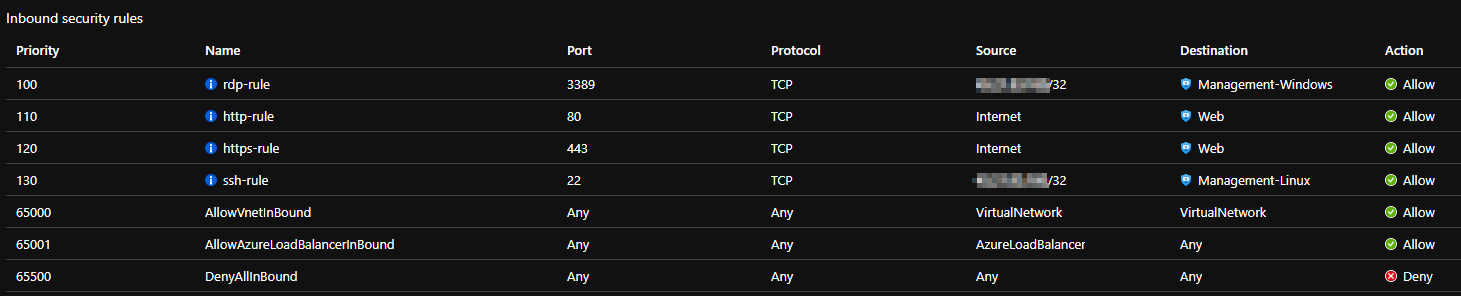
In a previous post I showed you how to create a resource group. The next thing I want to show you is how to create a vnet, subnet and a network security group with application security rules built in. This will result in a new network where we can place VMs or other objects. I am going to break down each section of this script and explain what is happening. At the end, I will put it all together so you can tweak it and use in your own environment.

Variables

This is the section you will change to fit your resource group, location and subnet preferences.

### Change these to your liking
$LocationName = "westus"
$ResourceGroupName = "Skylar-Testing"
$VnetAddressPrefix = "10.50.0.0/24"
$SubnetAddressPrefix = "10.50.0.0/24"

### Change these only if you don't like my naming convention
$NetworkName = "$ResourceGroupName-vnet"
$SubnetName = "$ResourceGroupName-subnet"

Create Application Security Groups

Application security groups are what you will use to define allow/deny rules based on ports for your VMs. In my example I make 3 groups;

Management-Linux
– I will use this group to attach a rule to allow SSH (Port 22) traffic.

Management-Windows
– I will use this group to attach a rule to allow RDP (Port 3389) traffic.

Web
– I will use this group to attach a rule to allow Web (Ports 80, 443) traffic.

### Create Application security Groups if they dont already exist
try {
    $asgLinux = get-AzApplicationSecurityGroup -Name "Management-Linux" -ResourceGroupName $ResourceGroupName -ErrorAction Stop
}
catch {
    $asgLinux = New-AzApplicationSecurityGroup -Name "Management-Linux" -Location $LocationName -ResourceGroupName $ResourceGroupName
}
try {
    $asgWindows = get-AzApplicationSecurityGroup -Name "Management-Windows" -ResourceGroupName $ResourceGroupName -ErrorAction Stop
}
catch {
    $asgWindows = New-AzApplicationSecurityGroup -Name "Management-Windows" -Location $LocationName -ResourceGroupName $ResourceGroupName  
}
try {
    $asgWeb = get-AzApplicationSecurityGroup -Name "Web" -ResourceGroupName $ResourceGroupName -ErrorAction Stop
}
catch {
    $asgWeb = New-AzApplicationSecurityGroup -Name "Web" -Location $LocationName -ResourceGroupName $ResourceGroupName
}

These are just the groups I am making, your needs may vary and in the next section you will see where the actual rules come into play.

Create Network Security Group (NSG) and apply rules

Here is where we create the actual nsg and apply rules to it. Your rules may vary but I think this is a good start. You might notice that the priority of each rule is set 10 apart. This allows us to add rules in between these few defaults. That way we can override one of these with a rule for a specific situation and put the priority lower than the more strict default rule. Another thing to note on the two management rules. In the code for this example I have the SourceAddresssPrefix set to Internet. This is not best practice for an actual production environment. Ideally you just use this for testing or better yet scope it down to your public IP. It would look something like 0.0.0.0/32 where the 0’s would be your public IP. You can get that easily here.

### Check to see if the NSG already exists and creates if not
try {
    $nsg = get-AzNetworkSecurityGroup -ResourceGroupName $ResourceGroupName -Name "$NetworkName-NSG" -ErrorAction Stop
}
catch {
    ### Security Group rules
    $RDP_Rule = New-AzNetworkSecurityRuleConfig -Name rdp-rule -Description "Allow RDP" `
    -Access Allow -Protocol Tcp -Direction Inbound -Priority 100 `
    -SourceAddressPrefix Internet -SourcePortRange * `
    -DestinationApplicationSecurityGroup $asgWindows -DestinationPortRange 3389

    $HTTP_Rule = New-AzNetworkSecurityRuleConfig -Name http-rule -Description "Allow HTTP" `
    -Access Allow -Protocol Tcp -Direction Inbound -Priority 110 `
    -SourceAddressPrefix Internet -SourcePortRange * `
    -DestinationApplicationSecurityGroup $asgWeb -DestinationPortRange 80

    $HTTPS_Rule = New-AzNetworkSecurityRuleConfig -Name https-rule -Description "Allow HTTPS" `
    -Access Allow -Protocol Tcp -Direction Inbound -Priority 120 `
    -SourceAddressPrefix Internet -SourcePortRange * `
    -DestinationApplicationSecurityGroup $asgWeb -DestinationPortRange 443

    $SSH_Rule = New-AzNetworkSecurityRuleConfig -Name ssh-rule -Description "Allow SSH" `
    -Access Allow -Protocol Tcp -Direction Inbound -Priority 130 `
    -SourceAddressPrefix Internet -SourcePortRange * `
    -DestinationApplicationSecurityGroup $asgLinux -DestinationPortRange 22 

    ### Create Network Security Group
    $nsg = New-AzNetworkSecurityGroup -ResourceGroupName $ResourceGroupName -Location $LocationName -Name "$NetworkName-NSG" -SecurityRules $RDP_Rule,$SSH_Rule,$HTTP_Rule,$HTTPS_Rule

}

Create vnet and subnet

Now that we have our asg’s and nsg we can create the vnet and associate it with what we created above. This is probably the shortest most straight forward section, but it couldn’t exist without the stuff we just did. Well it could, just wouldn’t have any security and we don’t want that! This section will check and make sure the vnet doesn’t already exist and then it uses all the info from above to create the vnet and the subnet inside. You shouldn’t have to edit this section.

#Check for Network and create if it does not exist
try {
    Get-AzResourceGroup $ResourceGroupName | Get-AzVirtualnetwork -Name $NetworkName -ErrorAction Stop
    Write-Host "Network exists!" -ForegroundColor DarkGreen
}
catch {
    Write-Host "Network does not exist.  It will now be created." -ForegroundColor DarkRed
    ### Create vnet and subnet
    $SingleSubnet = New-AzVirtualNetworkSubnetConfig -Name $SubnetName -AddressPrefix $SubnetAddressPrefix -NetworkSecurityGroup $nsg -ErrorAction Stop
    $Vnet = New-AzVirtualNetwork -Name $NetworkName -ResourceGroupName $ResourceGroupName -Location $LocationName -AddressPrefix $VnetAddressPrefix -Subnet $SingleSubnet -ErrorAction Stop
    Write-Host "Completed!" -ForegroundColor DarkGreen    
}

Put it all together

Here is the script in its entirety. Hopefully the explanation helped. This was kind of weird the first few times I did it.

$LocationName = "westus"
$ResourceGroupName = "Testing42"
$NetworkName = "$ResourceGroupName-vnet"
$VnetAddressPrefix = "10.50.0.0/24"
$SubnetName = "$ResourceGroupName-subnet"
$SubnetAddressPrefix = "10.50.0.0/24"


### Create Application security Groups if they dont already exist
try {
    $asgLinux = get-AzApplicationSecurityGroup -Name "Management-Linux" -ResourceGroupName $ResourceGroupName -ErrorAction Stop
}
catch {
    $asgLinux = New-AzApplicationSecurityGroup -Name "Management-Linux" -Location $LocationName -ResourceGroupName $ResourceGroupName
}
try {
    $asgWindows = get-AzApplicationSecurityGroup -Name "Management-Windows" -ResourceGroupName $ResourceGroupName -ErrorAction Stop
}
catch {
    $asgWindows = New-AzApplicationSecurityGroup -Name "Management-Windows" -Location $LocationName -ResourceGroupName $ResourceGroupName  
}
try {
    $asgWeb = get-AzApplicationSecurityGroup -Name "Web" -ResourceGroupName $ResourceGroupName -ErrorAction Stop
}
catch {
    $asgWeb = New-AzApplicationSecurityGroup -Name "Web" -Location $LocationName -ResourceGroupName $ResourceGroupName
}


### Check to see if the NSG already exists and creates if not
try {
    $nsg = get-AzNetworkSecurityGroup -ResourceGroupName $ResourceGroupName -Name "$NetworkName-NSG" -ErrorAction Stop
}
catch {
    ### Security Group rules
    $RDP_Rule = New-AzNetworkSecurityRuleConfig -Name rdp-rule -Description "Allow RDP" `
    -Access Allow -Protocol Tcp -Direction Inbound -Priority 100 `
    -SourceAddressPrefix Internet -SourcePortRange * `
    -DestinationApplicationSecurityGroup $asgWindows -DestinationPortRange 3389

    $HTTP_Rule = New-AzNetworkSecurityRuleConfig -Name http-rule -Description "Allow HTTP" `
    -Access Allow -Protocol Tcp -Direction Inbound -Priority 110 `
    -SourceAddressPrefix Internet -SourcePortRange * `
    -DestinationApplicationSecurityGroup $asgWeb -DestinationPortRange 80

    $HTTPS_Rule = New-AzNetworkSecurityRuleConfig -Name https-rule -Description "Allow HTTPS" `
    -Access Allow -Protocol Tcp -Direction Inbound -Priority 120 `
    -SourceAddressPrefix Internet -SourcePortRange * `
    -DestinationApplicationSecurityGroup $asgWeb -DestinationPortRange 443

    $SSH_Rule = New-AzNetworkSecurityRuleConfig -Name ssh-rule -Description "Allow SSH" `
    -Access Allow -Protocol Tcp -Direction Inbound -Priority 130 `
    -SourceAddressPrefix Internet -SourcePortRange * `
    -DestinationApplicationSecurityGroup $asgLinux -DestinationPortRange 22 

    ### Create Network Security Group
    $nsg = New-AzNetworkSecurityGroup -ResourceGroupName $ResourceGroupName -Location $LocationName -Name "$NetworkName-NSG" -SecurityRules $RDP_Rule,$SSH_Rule,$HTTP_Rule,$HTTPS_Rule

}

#Check for Network and create if it does not exist
try {
    Get-AzResourceGroup $ResourceGroupName | Get-AzVirtualnetwork -Name $NetworkName -ErrorAction Stop
    Write-Host "Network exists!" -ForegroundColor DarkGreen
}
catch {
    Write-Host "Network does not exist.  It will now be created." -ForegroundColor DarkRed
    ### Create vnet and subnet
    $SingleSubnet = New-AzVirtualNetworkSubnetConfig -Name $SubnetName -AddressPrefix $SubnetAddressPrefix -NetworkSecurityGroup $nsg -ErrorAction Stop
    $Vnet = New-AzVirtualNetwork -Name $NetworkName -ResourceGroupName $ResourceGroupName -Location $LocationName -AddressPrefix $VnetAddressPrefix -Subnet $SingleSubnet -ErrorAction Stop
    Write-Host "Completed!" -ForegroundColor DarkGreen    
}
Tagged : / / /

Use Powershell profiles

Powershell profiles are like startup programs for powershell. You can have it load in creds, set variables, login to a system, set formatting, and much more. I use a few simple tweaks to my profile that I think are helpful.

Profile location

First we need to know where the profile script is located. If you are using regular powershell or VSCode the path may be different so keep that in mind. To file your profile simple run the $PROFILE variable:

$PROFILE
Powershell profile path

Edit your profile

Now simply open the script and edit it. Anything you want to happen each time you open a powershell window can go in here. Here are a few that I like to use.

Timestamp on each new line

example of timestamp

I like to have a timestamp on each new line in my powershell window. I can easily see how long a script has run or what time I did a certain task. Add this code into your profile file to enable this:

function prompt {
    "[$(Get-Date -format 'hh:mm:ss tt')] PS $($executionContext.SessionState.Path.CurrentLocation)$('>' * ($nestedPromptLevel + 1)) ";
    }

Set path variable

I set a path variable for the base of my powershell scripts. There are other ways to do this but I like my variable. You can do this just as you would think, just set a variable:

$HD = "C:\Path\to\powershell\scripts"

This makes it so all I need to do to get back to my home directory and type in $HD.

Tagged : /

Create an Azure Resource Group with Powershell

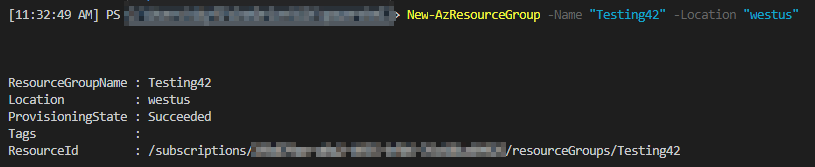
Resource groups are a fundamental component of Azure. Your VMs, Networks, Storage account(s), etc. all live in resource groups. Before we run the command we need to figure out WHERE we want to put the resource group. You can do this a few ways; one way is to pick from Microsoft’s website here. Another way is to list them from powershell:

List locations:

#List all Locations
Get-AzLocation

#To filter the list
Get-AzLocation | where {$_.Displayname -like "*west*"}

The info we need to is the Location. Once we have our location, we are ready to create our new resource group. You can do so with the following command. Make sure you are connected to Azure, you can see how to connect here.

Create Resource Group (Single Command):

New-AzResourceGroup -Name "Testing42" -Location "westus"

Create Resource Group (With Error Checking):

This is the same thing as above, just with a try-catch statement for error checking. This is what you would want to use in a larger script to make sure the resource group already existed.

$LocationName = "westus"
$ResourceGroupName = "Testing42"

#Check for resource group and create if it does not exist
try {
    Get-AzResourceGroup -Name $ResourceGroupName -ErrorAction Stop
    Write-Host "Resource group exists.  VM will be placed along side existing resources" -ForegroundColor DarkGreen
}
catch {
    Write-Host "Resource group does not exist.  It will now be created." -ForegroundColor DarkRed
    try {
        New-AzResourceGroup -Name $ResourceGroupName -Location $LocationName -Verbose -ErrorAction Stop        
        Write-Host "Completed!" -ForegroundColor DarkGreen        
    }
    catch {
        Write-Host "Failed to create resource group"
        exit        
    }
}
Creating a resource group

After running the command we get output that it was successful. It takes a minute or two for the resource group to show up in the Azure portal. If we want remove the resource group that can be done with this command.

Remove Resource Group:

Get-AzResourceGroup -Name "Testing42" | Remove-AzResourceGroup
Removing a resource group
Tagged : /

Powershell Infogetter

This script will help you gather info on devices in an OU. This script will lookup the devices in the OU you define and then for each it will; Test-NetworkConnection to see if the device is online, If online get the model, current user and OS Version. It will store this info in an array that you can then display or export to csv.

Fill input array

There are a couple ways to get info ready for this script. One way is to create a CSV file with one column named name and add one server name per line. We can then fill our $servers array with this command:

$servers = Import-Csv -Path "C:\Path\To\CSV.csv

The other way is to get PC names from an OU in Active Directory you can do that with this command. (make sure you have a connection to AD, see this Post)

$servers = Get-ADComputer -Filter * -SearchBase "OU=Computers,DC=Domain,DC=com"

Script:

$result = @()

foreach ($server in $servers) {
    $server = $server.name
    try {
        Test-NetConnection -ComputerName $server -ErrorAction Stop
        $model = Invoke-Command -computername $server -scriptblock {WMIC CSPRODUCT GET NAME} -ErrorAction Stop
        $username = Invoke-Command -computername $server -scriptblock {WMIC COMPUTERSYSTEM GET USERNAME} -ErrorAction Stop
        $OS = Invoke-Command -computername $server -scriptblock {WMIC OS GET VERSION} -ErrorAction Stop
        Write-Host $server "," $model "," $username "," $OS
        $result += "$server,$model,$username,$OS"
    }
    
    catch {
        Write-Host $server ",is,Off,line"
        $result += "$server,is,Off,line"
    }
}

Now we have an array of results you can display just by typing the $result and hit enter in PS. Or you can export it with this command:

$result | out-file C:\ps\output.txt
Tagged : /

Use Powershell to find and delete email from Exchange

Sometimes you need to delete an email from exchange and you usually need to do it in a hurry so Powershell is the fastest way to do this. First you need to have a connection to exchange in Powershell. For on-prem Excahnge you can RDP to the server and open the Exchange Powershell console straight from the start menu. Otherwise to get a connection you can see this post. To find and delete email we will use the following commandlets: Get-Mailbox and Search-Mailbox you can review the extra switches from those links. Here we are simply going to search by a subject and delete all the emails found in that query.

To find email

To find an email or emails you run the following command. This is searching by Subject but you can search other fields as well:

Replace USERNAME with the username of the mailbox you want to seach
Replace YOURUSERNAME with your username
Replace ‘virus’ with the subject search term you want to use. You can change Subject to any other mail field like Body.

Get-mailbox -identity USERNAME | search-mailbox –searchquery “Subject:’virus’” –Logonly –Targetmailbox YOURUSERNAME –Targetfolder Inbox

In Outlook under your inbox you will have a new folder that has the results of your query. Since we put in the -Logonly switch it will just tell you the count of how many emails were found. If you want to see the actual emails simply remove the -Logonly switch and re-run the command and in that same folder in your inbox you will get a copy of the actual emails to review.

To Delete email

Once you are happy with your find query you can delete the email by changing the command just a little bit. We remove the -TargetMailbox and -TargetFolder and -LogOnly (if you used it) and add in the switch -DeleteContent.

Get-mailbox -identity Username | search-mailbox –searchquery “Subject:’virus’” –DeleteContent
Tagged : / /

Use Powershell to output a list of users’ group membership to csv

Here is a quick and easy script for getting a list users group membership. Before we begin, if you need to know how to connect to Active Directory using powershell see this post. The idea is you feed a CSV file into the script that has a list of usernames in one columns like this:

Example of what the input csv file should look like

After you run the script you will get an output csv file that looks like this:

Example of output file

That’s pretty much it, here is the script:


#Set input file path
$inputcsv = "C:\ps\users.csv"
#Set output file path
$outputcsv = "C:\ps\out.csv"
#Clears file
"name,group" | Out-File $outputcsv

#import csv file
$list = Import-Csv -Path $inputcsv

#Start Loop
foreach ($user in $list) {
    #Set username veriable
    $username = $user.name
    #Get groups that the user is a member of
    $groups = Get-ADPrincipalGroupMembership $username | select -ExpandProperty name 

    #Secondary loop to output results
    foreach ($group in $groups) {
        #Output username and group in one line to output csv
        "$username,$group" | out-file $outputcsv -Append
    }    
}
Tagged : /

SCCM Script – Disable Windows Firewall

This is a simple script to disable windows firewall for all profiles (Private, Domain, Public). This is useful for a bunch of different reasons that I wont get into but here is the simple one line to put into the SCCM script. To create approve and add SCCM Scripts see this post.

Set-NetFirewallProfile -All -Enabled False

You can also use this one liner on a PC that you are logged into or have a pssession with.

Tagged : /

SCCM Script – Disable Weak TLS and SSL

This SCCM script will make sure TLS 1.2 is enabled and disables TLS 1.0, TLS 1.1, SSL 2.0 and SSL 3.0. To create approve and add SCCM Scripts see this post. It will create and set the appropriate registry keys. No reboot is required. This will start working once applied. Be warned this may break some older web applications so always test:

New-Item 'HKLM:\SYSTEM\CurrentControlSet\Control\SecurityProviders\SCHANNEL\Protocols\TLS 1.2\Server' -Force | Out-Null
    
New-ItemProperty -path 'HKLM:\SYSTEM\CurrentControlSet\Control\SecurityProviders\SCHANNEL\Protocols\TLS 1.2\Server' -name 'Enabled' -value '1' -PropertyType 'DWord' -Force | Out-Null
    
New-ItemProperty -path 'HKLM:\SYSTEM\CurrentControlSet\Control\SecurityProviders\SCHANNEL\Protocols\TLS 1.2\Server' -name 'DisabledByDefault' -value 0 -PropertyType 'DWord' -Force | Out-Null
    
New-Item 'HKLM:\SYSTEM\CurrentControlSet\Control\SecurityProviders\SCHANNEL\Protocols\TLS 1.2\Client' -Force | Out-Null
    
New-ItemProperty -path 'HKLM:\SYSTEM\CurrentControlSet\Control\SecurityProviders\SCHANNEL\Protocols\TLS 1.2\Client' -name 'Enabled' -value '1' -PropertyType 'DWord' -Force | Out-Null
    
New-ItemProperty -path 'HKLM:\SYSTEM\CurrentControlSet\Control\SecurityProviders\SCHANNEL\Protocols\TLS 1.2\Client' -name 'DisabledByDefault' -value 0 -PropertyType 'DWord' -Force | Out-Null
 
Write-Host 'TLS 1.2 has been enabled.'


New-Item 'HKLM:\SYSTEM\CurrentControlSet\Control\SecurityProviders\SCHANNEL\Protocols\SSL 2.0\Server' -Force | Out-Null
    
New-ItemProperty -path 'HKLM:\SYSTEM\CurrentControlSet\Control\SecurityProviders\SCHANNEL\Protocols\SSL 2.0\Server' -name 'Enabled' -value '0' -PropertyType 'DWord' -Force | Out-Null
            
New-ItemProperty -path 'HKLM:\SYSTEM\CurrentControlSet\Control\SecurityProviders\SCHANNEL\Protocols\SSL 2.0\Server' -name 'DisabledByDefault' -value 1 -PropertyType 'DWord' -Force | Out-Null
            
New-Item 'HKLM:\SYSTEM\CurrentControlSet\Control\SecurityProviders\SCHANNEL\Protocols\SSL 2.0\Client' -Force | Out-Null
            
New-ItemProperty -path 'HKLM:\SYSTEM\CurrentControlSet\Control\SecurityProviders\SCHANNEL\Protocols\SSL 2.0\Client' -name 'Enabled' -value '0' -PropertyType 'DWord' -Force | Out-Null
            
New-ItemProperty -path 'HKLM:\SYSTEM\CurrentControlSet\Control\SecurityProviders\SCHANNEL\Protocols\SSL 2.0\Client' -name 'DisabledByDefault' -value 1 -PropertyType 'DWord' -Force | Out-Null
Write-Host 'SSL 2.0 has been disabled.'


New-Item 'HKLM:\SYSTEM\CurrentControlSet\Control\SecurityProviders\SCHANNEL\Protocols\SSL 3.0\Server' -Force | Out-Null
    
New-ItemProperty -path 'HKLM:\SYSTEM\CurrentControlSet\Control\SecurityProviders\SCHANNEL\Protocols\SSL 3.0\Server' -name 'Enabled' -value '0' -PropertyType 'DWord' -Force | Out-Null
    
New-ItemProperty -path 'HKLM:\SYSTEM\CurrentControlSet\Control\SecurityProviders\SCHANNEL\Protocols\SSL 3.0\Server' -name 'DisabledByDefault' -value 1 -PropertyType 'DWord' -Force | Out-Null
    
New-Item 'HKLM:\SYSTEM\CurrentControlSet\Control\SecurityProviders\SCHANNEL\Protocols\SSL 3.0\Client' -Force | Out-Null
    
New-ItemProperty -path 'HKLM:\SYSTEM\CurrentControlSet\Control\SecurityProviders\SCHANNEL\Protocols\SSL 3.0\Client' -name 'Enabled' -value '0' -PropertyType 'DWord' -Force | Out-Null
    
New-ItemProperty -path 'HKLM:\SYSTEM\CurrentControlSet\Control\SecurityProviders\SCHANNEL\Protocols\SSL 3.0\Client' -name 'DisabledByDefault' -value 1 -PropertyType 'DWord' -Force | Out-Null
Write-Host 'SSL 3.0 has been disabled.'


New-Item 'HKLM:\SYSTEM\CurrentControlSet\Control\SecurityProviders\SCHANNEL\Protocols\TLS 1.0\Server' -Force | Out-Null
    
New-ItemProperty -path 'HKLM:\SYSTEM\CurrentControlSet\Control\SecurityProviders\SCHANNEL\Protocols\TLS 1.0\Server' -name 'Enabled' -value '0' -PropertyType 'DWord' -Force | Out-Null
    
New-ItemProperty -path 'HKLM:\SYSTEM\CurrentControlSet\Control\SecurityProviders\SCHANNEL\Protocols\TLS 1.0\Server' -name 'DisabledByDefault' -value 1 -PropertyType 'DWord' -Force | Out-Null
    
New-Item 'HKLM:\SYSTEM\CurrentControlSet\Control\SecurityProviders\SCHANNEL\Protocols\TLS 1.0\Client' -Force | Out-Null
    
New-ItemProperty -path 'HKLM:\SYSTEM\CurrentControlSet\Control\SecurityProviders\SCHANNEL\Protocols\TLS 1.0\Client' -name 'Enabled' -value '0' -PropertyType 'DWord' -Force | Out-Null
    
New-ItemProperty -path 'HKLM:\SYSTEM\CurrentControlSet\Control\SecurityProviders\SCHANNEL\Protocols\TLS 1.0\Client' -name 'DisabledByDefault' -value 1 -PropertyType 'DWord' -Force | Out-Null
Write-Host 'TLS 1.0 has been disabled.'


New-Item 'HKLM:\SYSTEM\CurrentControlSet\Control\SecurityProviders\SCHANNEL\Protocols\TLS 1.1\Server' -Force | Out-Null
    
New-ItemProperty -path 'HKLM:\SYSTEM\CurrentControlSet\Control\SecurityProviders\SCHANNEL\Protocols\TLS 1.1\Server' -name 'Enabled' -value '0' -PropertyType 'DWord' -Force | Out-Null
    
New-ItemProperty -path 'HKLM:\SYSTEM\CurrentControlSet\Control\SecurityProviders\SCHANNEL\Protocols\TLS 1.1\Server' -name 'DisabledByDefault' -value 1 -PropertyType 'DWord' -Force | Out-Null
    
New-Item 'HKLM:\SYSTEM\CurrentControlSet\Control\SecurityProviders\SCHANNEL\Protocols\TLS 1.1\Client' -Force | Out-Null
    
New-ItemProperty -path 'HKLM:\SYSTEM\CurrentControlSet\Control\SecurityProviders\SCHANNEL\Protocols\TLS 1.1\Client' -name 'Enabled' -value '0' -PropertyType 'DWord' -Force | Out-Null
    
New-ItemProperty -path 'HKLM:\SYSTEM\CurrentControlSet\Control\SecurityProviders\SCHANNEL\Protocols\TLS 1.1\Client' -name 'DisabledByDefault' -value 1 -PropertyType 'DWord' -Force | Out-Null
Write-Host 'TLS 1.1 has been disabled.'

To run the script you find the device or collection you want to run it on. Right click and click Run Script and select the script you want to run.

Tagged : / / / / /

SCCM Script – Create and Run SCCM Script

This is more of a reference post for my other posts with ACTUAL SCCM scripts in it. This on will show you how to create and run a SCCM script.

Step 1: Make sure you have the appropriate permissions

First and foremost if you are like me, you are probably the only one in your IT dept that knows powershell. By default in SCCM the author of a script cant approve his/her own script which is smart. However in my case there just isn’t anyone who is capable of honestly reviewing one of my scripts. To fix this setting go to the Administration tab and click Sites in the left pane and select your site. Now in the top bar select Hierarchy Settings now under general un-check the box next to Script authors require additional script approver

Now we need to make sure our user has the right permissions. Still in the Administration tab expand the Security folder on the left and select Administrative Users right click on your user and click Properties now under the Security Roles tab and make sure you are either a Full administrator which already has the right permissions or create a new role with SMS_Scripts permissions.

Step 2: Create a Script

Creating a script is pretty simple. Go to the Software Library tab and click on Scripts in the left pane. Now in the top left click Create Script. The window that pops up is where you will name your script and insert your code. This script is very simple it just reboots the system it is run on. Here is what the window looks like.

Once you name your script and add your code click Next, Next, Close.

Step 3: Approve the Script

Now that we have created the script we need to “approve” it. To do this make sure you are in the Software Library tab still and click on Scripts and select the script you want to approve and click Approve/Deny in the top bar. Now just Next, Put in a comment if you want, Next, Next, Close. Now the script is approved and ready to run.

Step 4: Run a Script

Scripts can be run on either a device directly or on a collection. To run a script go to the Assets and Compliance tab and select either Devices or Device Collections. For my example we are going to do a single device. From devices we search for the device we want to run the script on. Right click the device and select Run Script. In the window that comes up select the script you would like to run and click Next, Next. The script will now run on the device and you can see the status as is happens.

You can close this window and view the status later from the Monitoring tab then select Script Status from the left pane. You can then double click on the script you just ran and see the status. This is helpful if you run a script that takes a while to run and/or you run it on a larger collection.

Tagged : /

SCCM Script – Visual C++ Redistributable updater

While windows update will update the VCRedist packages you have installed it will not remove the old versions. Here is a script that can be used from the SCCM scripts section. To create approve and add SCCM Scripts see this post. The script will first check to see if chocolatey is installed and will attempt to install it if not found. After that as long as chocolatey was installed successfully it will move on to looking for installs of VCRedist and will uninstall all versions found and use chocolatey to install the latest version (it will install both x64 and x86). See comments in code for a few details like where you can add or remove versions to look for.

#Start checking for Chocolatey
try {
	invoke-command -scriptblock {choco} -erroraction stop
    write-host "Has Choco. all is good!"
    $Choco_installed = $true
}

catch {
	Write-Host "Needs Choco.  Trying install..." 
	try {
		invoke-command -scriptblock {Set-ExecutionPolicy Bypass -Scope Process -Force; Invoke-Expression ((New-Object System.Net.WebClient).DownloadString('https://chocolatey.org/install.ps1'))} -ErrorAction Stop
        $Choco_installed = $true
    }
	catch {
        write-host "Install Failed"
        $Choco_installed = $false
	}
		
}
Set-ExecutionPolicy -ExecutionPolicy Bypass -Scope Process -force;


#Checks to see if the above was successful
if ($Choco_installed -eq $true) {
    #this is where you can set the versions of VCRedist to look for
    $VCredistVersions = @()
    $VCredistVersions = (
        "2005",
        "2008",
        "2010",
        "2013",
        "2015",
        "2019"
    )

#Loop through each version
    foreach ($Version in $VCredistVersions) {
        if (get-wmiobject -Class Win32_Product| where {$_.name -like "*Microsoft Visual C++ $Version Redistributable*"}| select name,localpackage) {
            Write-Host "Found Microsoft Visual C++ $version Redistributable.  Removing old versions and installing latest..." -ForegroundColor Yellow
            $Packages = get-wmiobject -Class Win32_Product| where {$_.name -like "*Microsoft Visual C++ $Version Redistributable*"}| select name,localpackage -ErrorAction Stop
                    foreach ($Package in $Packages) {
                        $packagename = $Package.localpackage    
#Run the actual uninstall                        
cmd.exe /c "msiexec /x $packagename /qn"
                        Write-Host "Successfully uninstalled $packagename!" -ForegroundColor Green
                    }
                    #Install latest version
                    choco update vcredist$version -y -f
        } 
    }
}
Tagged : / / /

SCCM Script – Force Windows update from SCCM or Microsoft

Sometimes I have a server or workstation that for whatever reason I need to update outside of its scheduled maintenance window. Instead of having to RDP in and update manually I have this SCCM script. To create approve and add SCCM Scripts see this post. This script can be run directly on a workstation but it is meant to be run out of SCCM. I’ll share another version of this that can be used outside of SCCM. The magic behind this script is a module called PSWindowsupdate. Awesome module that lets you kick off updates from powershell. This will log the updates that were installed in a file on the C:\ drive names PSWindowsupdatelog-date.log. If you are “watching” this you can psremote into the endpoint and run this command to tail the log file and watch the progress:

type C:\PSWindowsupdate-date.log -wait


Script:

This one will get all available updates from Microsoft.

 try {                
            Import-Module PSWindowsupdate -ErrorAction 1 -verbose                
            }
            catch {
                Install-PackageProvider -Name NuGet -MinimumVersion 2.8.5.201 -Force
                Install-Module PSWindowsupdate -force -Confirm:$false -verbose
                Import-Module PSWindowsUpdate
            }

Import-Module PSWindowsUpdate
$updatelist = 0

$updatelist = Invoke-Command -ScriptBlock {Set-ExecutionPolicy -ExecutionPolicy Bypass -Scope Process;get-windowsupdate -WindowsUpdate -verbose}

Invoke-Command -ScriptBlock {Set-ExecutionPolicy -ExecutionPolicy Bypass -Scope Process;$date = get-date -f MM-dd-yyyy-HH-mm-ss;Invoke-WUJob -runnow -Script "Set-ExecutionPolicy -ExecutionPolicy Bypass;ipmo PSWindowsUpdate;get-windowsupdate -MicrosoftUpdate -verbose; Install-WindowsUpdate -Microsoftupdate -AcceptAll -autoreboot | Out-File C:\PSWindowsUpdate-$date.log" -Confirm:$false -Verbose} -Verbose

This one will get all the updates that have been approved through SCCM.

 try {                
            Import-Module PSWindowsupdate -ErrorAction 1 -verbose                
            }
            catch {
                Install-PackageProvider -Name NuGet -MinimumVersion 2.8.5.201 -Force
                Install-Module PSWindowsupdate -force -Confirm:$false -verbose
                Import-Module PSWindowsUpdate
            }

Import-Module PSWindowsUpdate
$updatelist = 0

$updatelist = Invoke-Command -ScriptBlock {Set-ExecutionPolicy -ExecutionPolicy Bypass -Scope Process;get-windowsupdate -verbose}

Invoke-Command -ScriptBlock {Set-ExecutionPolicy -ExecutionPolicy Bypass -Scope Process;$date = get-date -f MM-dd-yyyy-HH-mm-ss;Invoke-WUJob -runnow -Script "Set-ExecutionPolicy -ExecutionPolicy Bypass;ipmo PSWindowsUpdate;get-windowsupdate -verbose; Install-WindowsUpdate -AcceptAll -autoreboot | Out-File C:\PSWindowsUpdate-$date.log" -Confirm:$false -Verbose} -Verbose
Tagged : / / /

Chocolatey is awesome

If you have not heard of chocolatey, you are in luck! I will introduce you. Chocolatey is a package management tool for Windows, its a lot like apt or yum if you have used linux. With Chocolatey you can leverage powershell scripts to deploy and update apps on your local PC or remote servers or workstations. There site is here and goes into a lot more detail of how it all works: https://chocolatey.org/ In this post I will show you a few ways that I use Chocolatey to make my life easier.

First, the basics, Lets install it:

Install Chocolatey

This script will check to see if Chocolatey is installed by simply running the “choco” command to see if it returns anything. If it does not it will then attempt to install Chocolatey from their website.

try {
	invoke-command -scriptblock {choco} -erroraction stop
	write-host "Has Choco. all is good!"
}

catch {
	Write-Host "Needs Choco.  Trying install..." 
	try {
		invoke-command -scriptblock {Set-ExecutionPolicy Bypass -Scope Process -Force; Invoke-Expression ((New-Object System.Net.WebClient).DownloadString('https://chocolatey.org/install.ps1'))} -ErrorAction Stop
	}
	catch {
		write-host "Install Failed"
	}
		
}

But how do you search for apps!?

Find Choco apps

There are a couple ways to do this.

First, you can go to the website and look through the gallery here: https://chocolatey.org/packages

Second, you can use command line to search for a specific app:

choco search appname
or
choco list appname

Lastly you can install the chocolateygui app and use it to search. You can install it with this:

install chocolateygui -y

Once installed you will find it in your start menu. Simply open it and there is a nice search to look for new apps and update what you already have installed.

Ok, found and app. Lets install it.

Install Choco apps

Installing choco apps is just as easy as the searching. You can install one app at a time or multiple. You can always use the ChocolateyGUI app from the previous section but I want to show you the command line ways. Here are a couple ways to do it:

One at a time:

choco install packagename -y

Notice the -y at the end. If you don’t add that you will need to accept the install. Another switch that can be added is -f. If you add that switch it will force install the app even if its installed. Meaning it will reinstall what is already installed. I have mixed luck with that so keep it in mind that it depends on the app if you can use the -f switch.

Multiple apps at a time in one line:

choco install package1 package2 package3 -y

This method works fine but I have found that if you have more than a few apps the command gets a little long. I have another method for installing multiple apps using an array to hold the package names instead. It just looks better when you have a larger list of apps and is easier the change out apps as needed. Here is the one is use:

if (!([Security.Principal.WindowsPrincipal][Security.Principal.WindowsIdentity]::GetCurrent()).IsInRole([Security.Principal.WindowsBuiltInRole] "Administrator")) { Start-Process powershell.exe "-NoProfile -ExecutionPolicy Bypass -File `"$PSCommandPath`"" -Verb RunAs; exit }

#List packages you want to install
$packages = (
    "chocolateygui",
    "googlechrome",
    "notepadplusplus",
    "vlc",
    "winscp",
    "nmap",
    "autoit",
    "7zip",
    "putty",
    "git",
    "vscode",
    "openvpn",
    "vim",
    "mobaxterm",
    "adobereader",
    "rsat",
    "wireshark",
    "mousewithoutborders",
    "forticlientvpn",
    "microsoft-teams",
    "Office365Business"
)

#Loop through the packages
foreach ($package in $packages){

   #Instal each package and force a reinstall if its already there
   choco install $package -y -f


}

As you can see you can pretty much get all of your normal apps installed in one script. That top line is something I add to a lot a scripts that I plan on running from the actual .ps1 file. The line will check to see if the powershell session is running as admin and will reopen it as admin if not.

Final thing, updating!

Update Choco apps

There are a few ways to do this as well. Again you can use the ChocolateyGUI app to update one or all of the apps but here are the powershell ways:

Update one app:

choco upgrade packagename -y

Update all apps:

choco upgrade all -y

This will upgrade all the apps that you have installed via chocolatey. One of my favorite commands!

Tagged : / /

Use Powershell to Create and Add members to Active Directory Groups from csv

This is a task that I feel like there are a ton of ways to do it, this is just mine. With this you create a csv file with two columns; the first is the username of the person you want to add to the group and the second is the group that the person should be in. The script will check to see if the group exists and if it doesn’t it will be created in the path you define and then it will add the member, if the group does already exists it simply adds the user. This is a fast way to create a bunch of groups if you need to. For connecting to Active directory see this post.

Script:

#You need to have a connection to AD first or run this from a DC (see https://allthesystems.com/2020/08/powershell-connection-examples/)
#Define path to csv and basepath to create groups if they dont exist
$list = Import-Csv -Path C:\Path\to\csv\newgroups.csv
$BasePathForGroups = "OU=Path,OU=To,OU=OU,DC=Domain,DC=com"

foreach ($item in $list) {
    #Set variables for loop from csv line
    $group = $item.group
    $member = $item.member

    #Check if group exists
    if(Get-ADGroup $group){

        Write-Host "group exists. adding member: $member"
        #Adds member
        Add-ADGroupMember -Identity $group -Members $member

    }
    else {
        Write-Host "Group doesnt exist.  creating: $group"
        #Creates group
        New-ADGroup -Name $group -SamAccountName $group -GroupCategory Security -GroupScope Global -DisplayName $group -Path $BasePathForGroups
        #Adds member
        Add-ADGroupMember -Identity $group -Members $member 
    }

}
Tagged : / /

Powershell Add Portgroups to VMWare Hosts

If you don’t have licensing for distributed switches in vCenter adding portgroups to a new host or a new cluster can be super time consuming in the UI BUT thankfully VMWare has had mercy on us and provided comandlets to use Powershell to add portgroups to VMWare hosts. This is a script I use a lot to add portgroups to hosts and it is way faster and way less painful than doing it by hand so… enjoy! For PowerCLI setup and connecting to vCenter see this post.


Script:

#Check for Creds and ask for them if they aren't found
if (!($Creds)) {$creds = get-credential -Message "Enter your vCenter Creds"}
#Change these to your values
$vSwitchName = "vSwitch_Name"
$PortgroupName = "Name_of_Portgroup"
$VLanId = "123"
$vCenter_Server = "vCenter_Server_Name"
$Hosts = (
    "Host1",
    "Host2",
    "host3"
)

#Connect to vCenter
Connect-VIServer -server $vCenter_Server -Credential $creds -force

foreach ($Host in $Hosts) {
    #Adds portgroup to host
    get-vmhost -Name $Host | get-virtualswitch -name $vSwitchName |  New-VirtualPortGroup -name $PortgroupName -VLanId $VLanId
}
Tagged : / / /