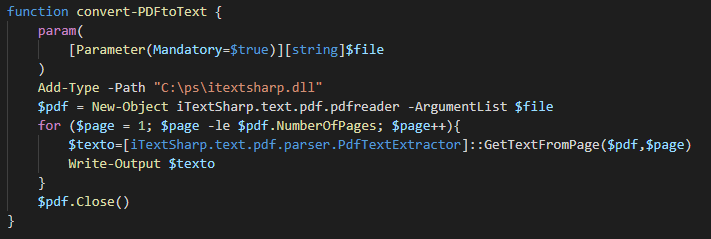
Read text from a PDF with Powershell

The other day I helped a co worker with a script he was working on. He needed to read text from a PDF with Powershell. I had done this in the past with autoit but that wasn’t going to be an option this time. There are a lot of posts about this online but they almost all lead to itext7 I don’t if my co worker and I are just dumb but we just could not get their module installed. I did end up finding a different way to get this done. You really just need this DLL that has the library to deal with PDF files. I cant upload it here but you can get it easily.

Get DLL

You can download the .DLL file from this site (UPDATE 10-19-21: the original .dll is no longer at the original link. Another commenter pointed out its on github here also I created a share link for the .dll I use for this and I know this one works. That link is here) . When you get to the site click the “Download Archive” button. This will give you a zip file. Extract it, inside the folder open sourceCode, Main, Libraries. There you will find itextsharp.dll. Copy this file to C:\PS\ (this is where our script will look).

Read text from PDF file

I made this into a function so it is easy to use in a larger script. here it is:

function convert-PDFtoText {
	param(
		[Parameter(Mandatory=$true)][string]$file
	)	
	Add-Type -Path "C:\ps\itextsharp.dll"
	$pdf = New-Object iTextSharp.text.pdf.pdfreader -ArgumentList $file
	for ($page = 1; $page -le $pdf.NumberOfPages; $page++){
		$text=[iTextSharp.text.pdf.parser.PdfTextExtractor]::GetTextFromPage($pdf,$page)
		Write-Output $text
	}	
	$pdf.Close()
}

This is is an example of how to run it and display the results to the screen.

$file = "C:\Path\To\PDF.pdf"

convert-PDFtoText $file

With this example we set the text into a variable for later use.

$file = "C:\Path\To\PDF.pdf"
$text = convert-PDFtoText $file
Tagged :

Use DeskDock and Wireless ADB to control your phone from your PC wirelessly

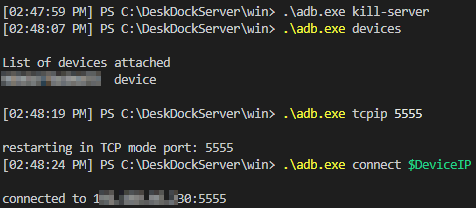
Today I want to show you how to use DeskDock to control your phone from your desktop….WIRELESSLY. I have been using DeskDock for a while now and I love it. I don’t love that I have to keep my phone plugged in all day to use it though. Today I had a revelation that, frankly, took way too long to happen. DeskDock simply uses ADB commands to control your phone, and ADB CAN work wirelessly. So, I gave it a shot and surprisingly it just worked. I already had DeskDock up and running but I’ll give a quick overview and links to the process. At the end I will share my script to automate the daily setup part.

Install DeskDock

Setting DeskDock up is pretty easy. You download the server program onto your PC and run it. On your Android phone you enable Developer mode and usb debugging, next download the app, run it, then plug in your usb cable. The main thing on the server side (your PC) is to make sure you have the right ADB drivers for your phone. I have a Pixel so I used this link. Also, here is the link to the setup from the developer of Deskdock.

PC (server) side setup

The only two prep-work we need to do is install Java (if you don’t already have it) and the ADB drivers for you phone.

Install Java
You can install java from their website or if you have Chocolatey you can simply run

choco install jre8 -y

Install ADB USB Driver
Installing ADB drivers is pretty easy as well, its really just about downloading the right one. I have a Pixel so I used the one here but if you have another type of phone you should find the right drivers in this list.

Download and run the server app
Download the latest server app from here. Place the folder on the C:\ drive and rename it to DeskDockServer (no version number). You don’t need to put it on the C:\ drive if you just want to use DeskDock with a USB cable, BUT if you want to use my script you do. Now go into that folder and right click on the DeskDockServer.exe and hover over send to and click Desktop (create Shortcut). We will use this shortcut in the next step. Next, to get this to autostart we will add it to our startup folder. From the Run prompt (or cmd or pwsh) type in shell:startup and hit enter. This will open up your startup folder in explorer. Now copy or cut the shortcut we just made on the desktop into this folder. Now, every time you login DeskDock will autostart. Go ahead and double click our new shortcut to start the server this time for our next steps.

Phone Side setup

For our phone setup we need to do a few things; Enable Developer mode, enable usb debugging and make sure wireless adb is enabled.

Enable Developer Mode
Enabling developer mode on android is pretty easy as well. Just go into settings, about phone and then tap your build number 8 times. This will enable the developer mode options.

Enable USB Debugging
Next we need to enable usb debugging. Do this from System, Advanced, Developer Options. Scroll down until you see USB Debugging and toggle it to on. After you do this step you can actually start using DeskDock, but with a usb cable only. If you want to NOT have to plug in every time you can enable wireless adb and that will allow you to control your phone without plugging in.

Enable Wireless ADB

Wireless ADB will kill itself when your phone reboots. You will need to do this step every time you reboot your phone. This is the manual way. Later in this post I will share a script that does this for us. To do this manually open an admin powershell window and path to the deskdock folder. If you followed my advice above it will be at c:\ so the command would be:

cd C:\DeskDockServer\win\

Lets check to see that the device is connected

.\adb.exe devices

This should return your devices as what looks like a serial number (see below image for all commands)

Run the following command to enable wireless adb. You CAN change the port but I recommend against it. If you plan on using Tasker for anything extra fancy it needs to be port 5555:

.\adb.exe tcpip 5555

This will just return “restarting in TCP mode port: 5555”

Next is to make the connection. The first time you do this you will get a permission prompt pop-up on your phone. Make sure you check the box that says always allow or you will need to accept each time. Replace $DeviceIP with the IP address of your phone. You can get it from the advanced section in the wireless menu. In the script later on I have a way to get it without looking at your phone settings.

.\adb.exe connect $DeviceIP

You are now connected to your phone and can control it with DeskDock wirelessly.

Script to Enable Wireless ADB and connect to phone

I was excited to get this working but I quickly realized what a pain this was going to be every morning. Before using DeskDock wirelessly I would come into work, boot my PC, open the DeskDock app on my phone, then plug in the USB cable (sometimes a few times!) and I and i would be off to the races. Now I need to open a powershell window and run a few commands each time and I have to make sure my IP didn’t change too. Boo! Enter powershell. I made a quick script that will do these things for us! This code is pretty short and I commented it like crazy so you should be able to follow along pretty easily. I made this in to an .exe as well that I put in my shell:startup folder so it starts up with my PC. It wont let me host exe files though so I will figure out how to do that and update the post. for now here is the powershell code:

### Make sure powerhsell is loaded as admin
if (!([Security.Principal.WindowsPrincipal][Security.Principal.WindowsIdentity]::GetCurrent()).IsInRole([Security.Principal.WindowsBuiltInRole] "Administrator")) { Start-Process powershell.exe "-NoProfile -ExecutionPolicy Bypass -File `"$PSCommandPath`"" -Verb RunAs; exit }
### Load in the ability to make messagebox windows
Add-Type -AssemblyName PresentationCore,PresentationFramework

### Path to our Deskdock Dir that has ADB in it
cd C:\DeskDockServer\win

### Kill any existing instances of ADB server
.\adb.exe kill-server

### This makes a message box telling the user to plug in their device. 
### We need to plug the device in this first time to enable wireless ADB 
### as well as to get the IP address of the device so we can make our connection
[System.Windows.MessageBox]::Show('Plug the phone in now and click OK')
$IPmess = .\adb.exe shell ip route
$IPCleaner = $IPmess.Split(" ")
$IPIndex = $IPCleaner.count - 2
$DeviceIP = $IPCleaner[$IPIndex]
.\adb.exe tcpip 5555
.\adb.exe connect $DeviceIP
[System.Windows.MessageBox]::Show('Should be ok to unplug now')

### Device should be connected at this point.  The below is just a look to kill and restart
### the adb server if your device goes off the network.  When the device comes back the script
### will try to reconnect the device. 
$DeviceConnect = $true
$pigs = "Flying"
while ($pigs -eq "Flying") {
    
    # $TestConnection = Test-NetConnection -ComputerName $DeviceIP -Port 5555 | select -ExpandProperty TcpTestSucceeded
    $TestConnection = .\adb.exe devices

    if ($TestConnection[1]) {
        Start-Sleep -Seconds 10
        Write-Host "connected"
    }
    else {
        
        .\adb.exe kill-server
        $ping = $false
        while ($ping -eq "False") {
            $ping = Test-NetConnection -ComputerName $DeviceIP | select -ExpandProperty TcpTestSucceeded
            Start-Sleep -Seconds 10
            .\adb.exe kill-server
        }
        .\adb.exe connect $DeviceIP
    }
}

Tagged : /

Enable Admin share on non-domain PC or server

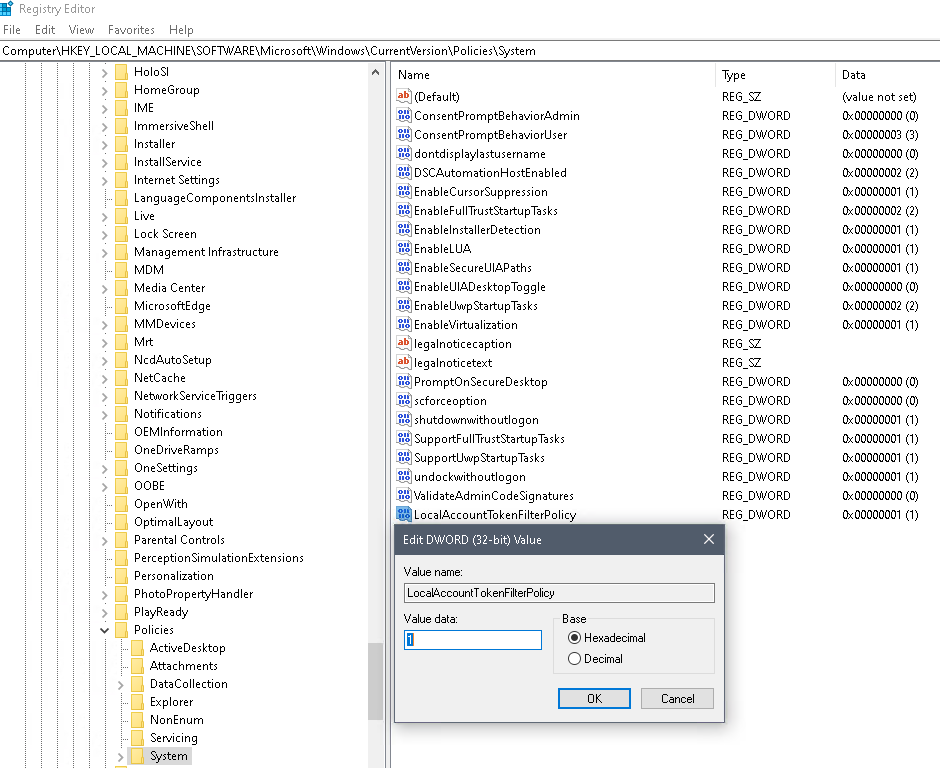
In this quick post I will show you how to enable an Admin share on non-domain PC or server. When a PC or Server is added to the domain, as a result, the system will automatically make the \\servername\C$ (and any other drive letters) available. What if you have a PC you intentionally want to leave off the domain? We’re in luck. There is a very easy way to enable this feature manually. It can be done the following ways:

Powershell (or CMD)

open an admin powershell or CMD window and run the following command

REG ADD HKLM\SOFTWARE\Microsoft\Windows\CurrentVersion\Policies\system /v LocalAccountTokenFilterPolicy /t REG_DWORD /d 1 /f

Now, Reboot. As a result of this command the \\server\c$ and any other drive letters) are available.

Regedit

Open Regedit and go to the following key:

HKEY_LOCAL_MACHINE\SOFTWARE\Microsoft\Windows\CurrentVersion\Policies\system

Right click in the white space and select New, then DWORD (32-bit) Value.

enable an Admin share on non-domain PC or server.

Name the new value LocalAccountTokenFilterPolicy. Double Click the new value and change the data to 1

enable an Admin share on non-domain PC or server.

Now, Reboot. As a result of this command the \\server\c$ and any other drive letters) are available.

Tagged :