Install Bethesda Launcher and Oblivion on Linux (Kubuntnu 20.04) Ubuntu 20.04

Recently I wanted to relive Oblivion but getting it up and running on my current Kubuntu setup was a struggle. I realize Lutris is a great option for installing games on Linux. However, I have had mixed luck with it. It caused the strangest issue with my external displays where any app that used OpenGL. Any time one of these apps would open, my external displays would get disconnected… Super strange, but when I uninstalled Lutris the issue stopped. Due to this, I figured out how to Install Bethesda Launcher with with Wine and Winetricks. Then after that was up and running I was having issues actually installing Oblivion. That’s when I found this helper script that when you run it allows you to install games inside Bethesda launcher. After that I ran into an issue where after a few minutes of playing Oblivion it would crash. Its due to codecs missing and after installing gstreamer1.0-plugins-bad:i386 and gstreamer1.0-plugins-ugly:i386 the game stopped crashing. Here are the steps I followed to Install Bethesda Launcher with wine and Oblivion on Linux.

Installing Wine from WineHQ and Winetricks

I followed the guide from WinHQ’s website here. Basically you do these few commands:

Enable 32-bit (i386) applications in Apt

sudo dpkg --add-architecture i386 

Download and install key

wget -nc https://dl.winehq.org/wine-builds/winehq.key
sudo apt-key add winehq.key

Install repository for Ubuntu 20.04

sudo add-apt-repository 'deb https://dl.winehq.org/wine-builds/ubuntu/ focal main'

Install stable version of WineHQ

sudo apt update && sudo apt install --install-recommends winehq-stable

This install takes a little while but will add all the components we need. The next thing we need is winetricks. Winetricks will be used to install missing windows components needed for the game to run. Install winetricks:

sudo apt install winetricks

Add Needed components from winetricks

Now if we tried to install Bethesda launcher it will install but, when you open it, text will be blank. To avoid this we need to install a couple things in winetricks:

Open winetricks with this command. It’s important that you DO NOT use sudo here:

winetricks
Winetricks main screen

The main winetricks window will open. Click “Select the default wineprefix” and then click OK. In the next screen select “Install a Windows DDL or component” and click OK.

Winetricks default prefix menu

Now scroll down and select vcrun2008 and click ok. This will install the x86 and x64 version of vcrun2008. When that is complete go back into “Install a Windows DLL or component” and this time install vcrun2012. Once that is complete select “Install a Font.” In this menu, select corefonts and click OK. This install takes a bit longer than the others. You will keep getting pop up boxes, just keep clicking ok until it all completes. You can now close winetricks.

Install MPG123 codec support

As I mentioned above, if you don’t add MPG123 support Oblivion will crash after a few minutes. To get this support you need to install a couple x86 gstreamer packages; gstreamer1.0-plugins-bad:i386 and gstreamer1.0-plugins-ugly:i386. To install these run:

sudo apt install gstreamer1.0-plugins-bad:i386 && sudo apt install gstreamer1.0-plugins-ugly:i386

Now that we have taken care of the prereqs lets install Bethesda Launcher.

Installing Bethesda Launcher

Now we can do the actual installs. First we need to get the latest bethesda launcher install from here. Now open terminal and path to the download. Run this command to start the install:

wine BethesdaNetLauncher_Setup.exe

This will launch the installer. Go through it and will will install the launcher and open it. Now you can sign in and we can install Oblivion!

Installing Oblivion

Before we can install anything with the Bethesda launcher we need to get the helper script. Download this script and put it in the same directory as the Bethesda Launcher. For me the location is here: /home/user/.wine/drive_c/Program\ Files\ \(x86\)/Bethesda.net\ Launcher/. Once that file is created make sure its executable by running:

chmod +x helper.sh

now run the script:

./helper.sh
Helper script running in terminal

If the script runs correctly you should see that it renames a file. If that all looks good head back over to the launcher and install Oblivion (or any other game you want to buy). The install will complete and you can click “Play” to launch Oblivion right from the launcher.

Oblivion installer screen inside Bethesda Launcher

You may not want to wait for the launcher to open everytime you want to play so here is a launcher script you can create. This will launch Oblivion from terminal without waiting for the launcher to open. I got this from here. Create a file with these contents:

#!/bin/sh
# This script disables all the text output for Wine
# debugging for improved performance.
export WINEDEBUG=fixme-all,err-all,warn-all,trace-all
OBLIVION_DIR=/opt/games/Windows/Oblivion
cd "${OBLIVION_DIR}"
wine OblivionLauncher.exe

You need to change the OBLIVION_DIR line to have to path to your Oblivion install. My completed file looks like this:

Oblivion launcher script example

now make sure your script is executable:

chmod +x oblivion.sh

Now you can launch Oblivion with:

./oblivion.sh

You can also use this method to install any of the other games in the Bethesda Launcher library.

Tagged : /

Squid Proxy Setup Ubuntu 20.04

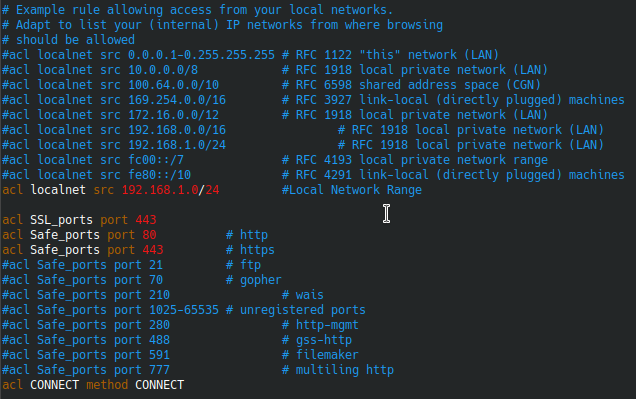
Squid is a caching web proxy service. There are many reasons why you might want to setup a Proxy server but for me its mainly so I can get to certain webpages to go through my home connection rather than work. Today I want to go through the setup of using squid on an Ubuntu 20.04 server I have on my home network that I can access through a wiregaurd connection. This way I don’t have to expose the proxy server to the internet but I can pick and choose which domains I want to go over proxy. Here are the steps to get it up and running.

Step 1: Install Squid

To install run this:

sudo apt update && sudo apt install squid
Step 2: Configure Squid

There are a ton of things you can do here but my needs are super basic so I will highlight what I changed. Just know if there is something you want to do and I don’t cover it, doesn’t mean it cant be done. Here is a link to the config reference for squid if you want to look into something I don’t point out here. Edit the config file:

sudo vi /etc/squid/squid.conf

If you want to change the ip/port that the proxy will listen on look for look for this line

http_port 3128

change it to your needs, should look like this:

http_port IP:PORT
Example:
http_port 192.168.1.2:3128

The acl section is where we are going to set some rules. By Default it has some example networks. Comment these out and add only the networks you want to have access to the proxy. For me I only want my local network to have access since that is where my traffic will come from. They also allow a ton of ports by default I commented out the ports I don’t want going over the proxy. If you want to block ports comment them out from this section. Here is what my section looked before making changes:

After:

Next we need to allow the localnet acl with by adding this line above http_access deny all like this:

Next setting would be DNS. On my server I have pihole setup so it IS the DNS server I want to use but if you need to change it look for the line dns_nameservers and add your dns server like this:

dns_nameservers 1.1.1.1 8.8.8.8

Once you are done editing the config save and close and then run this to check the config. It should return 0:

Step 3: Start Squid and enable service

Next we start squid and enable it as a service:

sudo systemctl enable squid.service && sudo systemctl start squid.service

That’s it! Squid is up and running. Now to test!

Step 4: Configure Client

This is where we actually get to use the thing! There are basically two ways to use this. We can set the Whole PC or Browser to use this proxy. However, if we do that ALL http/https traffic will go over the proxy and that might not be good if using this from work or somewhere you need access to local resources as well. Another option is to use a browser extension called foxyproxy to proxy on CERTAIN URLs through the proxy. That’s the way I went so here is how to set that up.

First, add the FoxyProxy standard extension to your browser (I’m using Chrome). Don’t get the basic one, it doesn’t have the ability to match URLs. Once added click the little fox logo in the top bar of chrome and click options. Now click add new proxy. Fill out your Proxy IP and port from our setup earlier. Then go to the URL Patterns tab and here you can define URLs you want to go over the proxy. Here is my example for Reddit.com

The next step is important! At the top of the options menu of FoxyProxy there is a dropdown. Change it to Use proxies based on their pre-defined patterns and priorities

Now you have a working proxy that can be used for certain domains.

Tagged : / /