Yubikey Linux 2 Factor login and Sudo

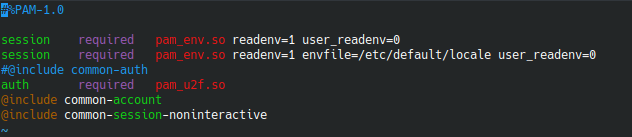
Using the Yubikey for securing your login to Linux is a great step. Here is how I setup 2FA login with Yubikey on Kubuntu. Yubico actually has a pretty good guide for this here but it doesn’t show you how to make it with with KDE’ login screen (SDDM), and I use that so here is what I did to make it work. With this config my PC is setup to require a password and the Yubikey at login/lock screen and then for sudo I require ONLY the Yubikey.

Step 1: Get the Software

Download the tool:

sudo apt install libpam-u2f
Step 2: Enroll Primary and Backup keys

Create the directory:

mkdir ~/.config/Yubico

To enroll primary key. Plug the primary key and run:

pamu2fcfg > ~/.config/Yubico/u2f_keys

Tap they Yubikey when it lights up.


Now to enroll the secondary key. Plug the backup key in and run:

pamu2fcfg -n >> ~/.config/Yubico/u2f_keys

Step 3: Add to common-auth

To set the Yubikey to be required for login and well anything that uses common-auth you can add this line to /etc/pam.d/common-auth

auth       required   pam_u2f.so

I added it to the end of the file and now my common-auth file looks like this:

For me this made the login, lock and sudo all require both my password and my Yubikey. I didn’t want this for sudo so I did the next step.

Step 4: Set sudo to require Yubikey only

I wanted to be asked for JUST the Yubikey when I sudo so I changed the /etc/pam.d/sudo file by commenting out @include common-auth and added this line auth       required   pam_u2f.so Now the file looks like this:

Now when I run sudo I simply have to tap my Yubikey to authenticate

Tagged : / / /

Yubikey Lock PC and Close terminal sessions when removed

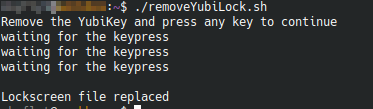
Locking your PC when you walk away is super important so someone cant mess with your PC while you are away. It’s usually just a co worker messing with your background or icons BUT it could have some serious consequences is a bad actor was to get on your PC unattended. Since I use my Yubikey for 2FA I wanted to take an extra step and have my PC lock and close all my terminal sessions when I remove the Yubikey. I found a post here that I followed for getting the screen to lock but I added the extra step of closing my terminal windows. Here are the steps I followed:

First I needed to get the vendor-ID and model-ID of my Yubikey 5NFC (if you have the same model you can PROBABLY use the same info as me, but if its a different model this is how you find it). First plug in your Yubikey and then from terminal type in:

sudo udevadm monitor --environment --udev

Now remove the Yubikey and look at the output (you can kill the command at this point too with ctrl+c). The output is crazy long but towards the “semi-topish” you should see something similar to this:

We are looking for the ID_VENDOR_ID (1050) and ID_MODEL_ID (0407 or 407 if you drop the leading 0). Now lets take this info and put it into a file called 20-yubikey.rules located at: /etc/udev/rules.d/ the file should look like this:

ACTION=="remove", ENV{DEVTYPE}=="usb_device", ENV{SUBSYSTEM}=="usb", ENV{PRODUCT}=="1050/407/*", RUN+="/home/user/lockscreen.sh"

The important part to change is you have a different model is the “ENV{PRODUCT}==”1050/407/*” the 1050 the vendorID and the 407 is the model. Also the RUN+=”/home/user/lockscreen.sh” this should point to wherever you put the lockscreen script. I put it in my user dir but it can go anywhere you feel is secure.

Now that we have that file we need to reload the udev rules (or reboot)

sudo udevadm control --reload-rules

Now for the script that actually does the stuff! I thought I got this from this guy here because I remember following that post… but his script is different than mine…so if I find who I got this from again I’ll re tag it for credit but I modified it to also kill all of my konsole sessions as well. Here is the script:

#!/usr/bin/sh
# this script is only suitable for a single use machine as the following will lock and kill all non root sessions
# if unable to unlock your screensaver screen lock, check the permissions of your U2F key mappings. Your screen lock 
# will run under your current user permission 

user=`ps aux | grep -v root | grep session | head -n 1 | awk '{print $1}'`
sessionids=`loginctl list-sessions | grep ${user} | awk '{print $1}'`
for sessionid in $sessionids
do
        loginctl lock-session $sessionid
        echo "U2F locked sessionid $sessionid  ($user)" | systemd-cat -p info -t udev
done

# close any other tty sessions
ttys=`who | grep tty | grep -v \(:0\) | awk '{print $2}'`
for tty in $ttys
do
        pkill --signal HUP -t $tty
        echo "U2F killed $tty ($user)" | systemd-cat -p info -t udev
done
kill $(ps aux | grep 'konsole' | awk '{print $2}')

Put this in a file called lockscreen.sh and place it where you specified in the 20-yubikey.rules file. For example mine went here: /home/user/lockscreen.sh
Next we need to make the script executable as well as make it accessible only by our user:

sudo chmod 700 lockscreen.sh

Now if everything went right when you remove your Yubikey your PC will lock and close all tty and konsole windows.

This is all good an fine but we have an issue if we want to remove the Yubikey WITHOUT the PC locking. For this is wrote a tine script to simply remove the lockscreen file and after you press a key it replaces the file. To get this working we first copy our current lockscreen file:

cp lockscreen.sh lockscreen.sh.bak

Now create another file called removeYubilock.sh with this:

#!/bin/bash
rm /home/user/lockscreen.sh
echo "Remove the YubiKey and press any key to continue"
while [ true ] ; do
read -t 3 -n 1
if [ $? = 0 ] ; then
cp /home/user/lockscreen.sh.bak /home/user/lockscreen.sh
echo "Lockscreen file replaced"
exit ;
else
echo "waiting for the keypress"
fi
done

Now make it executable:

sudo chmod 700 removeYubiLock.sh

Now to test:

Now we have a working autoscreen locking using our Yubikey!

Tagged : / /

Yubikey and Full disk encryption

Full disk encryption is a great way to secure your hard drive. The downfall to it though is to make it truly secure you need to have a long password, and typing it in at each boot is painful. Enter the Yubikey. You can use the secondary slot in your Yubikey for a challenge/response to unlock your disk. This way you can setup a pretty easy/short challenge password but since it needs to match up with your Yubikey to unlock an encrypted disk it is a lot more secure. In this post ill show you how I set it up on my laptop. When i set it up I followed these two articles: one and two. I like number two a little better but there is a part mentioned in number one about modifying the file at /etc/ykluks.cfg to have a custom message at the unlock screen. Since those two did such a good job I wont go into crazy detail but here are the basic steps. See the linked articles for a more detailed steps:

Step 1: Setup Linux with encrypted LUKS

Pick the distro you want to use (I’m currently using Kubuntu). During install make sure to check the box to encrypt the disk. It will make you set a password. I recommend a easy password at this point and we can change it later on.

Step 2: Install the yubikey-luks package

install this package:

sudo apt update && sudo apt install yubikey-luks
Step 3: Setup Yubikey slot 2

Yubikey comes with two slots and if you dont know that you are probably using slot 1 only which is good for this step. To setup slot 2 for challenge/response run the following:

ykpersonalize -2 -ochal-resp -ochal-hmac -ohmac-lt64 -oserial-api-visible

Make sure you do this on your backup key as well

Step 4: Find Encrypted Drive Name

To find the name of the disk we need to encrypt run:

lsblk --fs

We’re looking for the name next to crypto_LUKS in this case it is nvme0n1p3

Step 5: Enroll Primary Yubikey

We are going to write to slot 6 first with our primary key and then slot 7 with the backup key.

sudo yubikey-luks-enroll -d /dev/nvme0n1p3 -s 6

You will be asked for two passwords here first one is the password you want to use for challenge/response each time you unlock the disk. You will enter that twice and then be asked for an existing password to unlock the disk. This is the password you entered during the OS setup for LUKS.

Step 6: Enroll Backup Key (optional but highly recommended)

If you have a second Yubikey now is a good time to enroll it. The command is similar:

sudo yubikey-luks-enroll -d /dev/nvme0n1p3 -s 7

You will be asked for two passwords here first one is the password you want to use for challenge/response each time you unlock the disk. I recommend using the same one you picked for your primary key so you don’t get confused. You will enter that twice and then be asked for an existing password to unlock the disk. This is the password you entered during the OS setup for LUKS.

Step 7: Make it work! Edit Crypttab

Now we we need to edit the /etc/crypttab file to look at the yubikey unlocking script.

vi /etc/crypttab

Before editing my file looked like this:

nvme0n1p3_crypt UUID=19ed1cf2-bcdd-4184-9a1b-21087rg231d none luks,discard

We need to add this line “keyscript=/usr/share/yubikey-luks/ykluks-keyscript” in right after luks, so the end file looks like

vme0n1p3_crypt UUID=41eg3cf3-bctd-4481-3a1c-24099f25474e none luks,keyscript=/usr/share/yubikey-luks/ykluks-keyscript,discard
Step 8: Reboot and test

Now reboot and make sure your Yubikey. You need to have the Yubikey plugged into your PC before the unlock screen shows up or it doesn’t read you Yubikey. If you don’t already have it plugged in all is good just plug it in and enter a blank password, it will fail and come back, enter your password and hit enter and it will work this time. After you test the primary key reboot and do the same with the backup.

Step 9: Change the manual passphrase

During the initial setup of the encrypted disk you entered a simple password for unlocking the disk. Now that we have the Yubikeys setup lets change that pw to something long. I made mine 40 characters long and saved it in my password vault. To change yours run:

sudo cryptsetup luksChangeKey /dev/nvme0n1p3

Change the nvme0n1p3 part with your device. It will ask you for for the password you want to change and then have you enter the new one twice. That’s it! All done! We now have a disk that is fully encrypted and can unlock with challenge/response + Yubikey or our super long passphrase.

Tagged :

Yubikey to secure your accounts

I have been using multi-factor authentication pretty much since google started offering it back around 2013. It has always made me feel a little more secure and was super easy to setup. With that said, I have always been a little reluctant to try out hardware tokens like Yubikey. Mainly because I didn’t want to carry around a device to only use it with one account. That has changed though! Yubikey is compatible with pretty much every online account I use these days including LastPass. The thing that pushed me over the edge was when I saw an article talking about using Yubikey for a second factor for Linux logins as well as ssh. I was sold! I headed over to Amazon and picked up 2 Yubikey 5 nfc keys. Yes, you need two. Imagine getting your accounts secured with your one Yubikey and then you lose it…. yea, you need two; 1 as a daily carry and the other as a backup to store safely at home. Setting up my online accounts with the Yubikey was as easy as logging into each account, going to the my account/security section and just literally clicking add Yubikey, placing the key in and tapping the little disc, and then repeating with the backup key. Getting it to work with my Kubuntu laptop was a little trickier. I followed a couple guides together to get it done (I’ll link them in each post), but I wanted to put together the few guides into one so…. The next couple posts cover setting Yubikey up for full disk encryption, login, sudo. As a bonus I’ll show how to have your PC auto lock when your Yubikey is removed and getting Howdy facial recognition working as well.

Tagged :