SCCM Script – Force Remove Flash

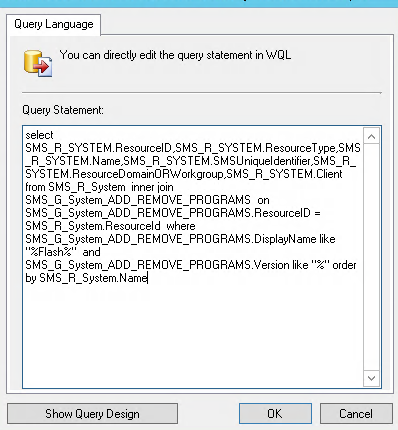
Well, Flash is finally dead and you probably want to get it off all your systems. Here is a script that you can use to uninstall flash and remove all leftover folders. See my post here to learn how to create and run a script in SCCM. The script leverages the uninstall tool that adobe provides here and also removes the app data folders for each user. The only thing you need to modify in this script is the source path where you put the uninstaller. You may want to re-hash the when you download it as well just in case its different than what in the script.

EDIT 3-19-21: I have run into additional permission issues on some PCs where, for some reason, ‘Trusted Installer’ is the owner of the Flash folders. Below is the updated script that handles this issue by giving ‘System’ ownership of the folder.

#Create a temp dir if its not already there and copy the uninstall tool 
$dir = "C:\temp"
mkdir $dir
robocopy "\\Put\Source\Path\Here"  "C:\temp" uninstall_flash_player.exe

#Get hash value of the file we just copied... JUUUUST in case
$hash_value = Get-FileHash -Path "C:\temp\uninstall_flash_player.exe"

#Compare the hash value and only run the exe if they match
if ($hash_value -eq "3319A87F23773CEA36181069FA0832AC1264A7D49CEA9BF7C78DA6C650871D47") {

    $acl = Get-Acl C:\Windows\SysWOW64\Macromed\Flash
    $AccessRule = New-Object System.Security.AccessControl.FileSystemAccessRule("NT AUTHORITY\SYSTEM","FullControl","Allow")
    $acl.SetAccessRule($AccessRule)
    $acl | Set-Acl C:\Windows\SysWOW64\Macromed\Flash

    $acl = Get-Acl C:\Windows\SysWOW64\Macromed\Flash
    $object = New-Object System.Security.Principal.Ntaccount("NT AUTHORITY\SYSTEM")
    $acl.SetOwner($object)
    $acl | Set-Acl C:\Windows\SysWOW64\Macromed\Flash

    foreach($_ in (Get-ChildItem "C:\Windows\SysWOW64\Macromed\Flash" -recurse)){
        $acl = Get-Acl $_.fullname
        $object = New-Object System.Security.Principal.Ntaccount("NT AUTHORITY\SYSTEM")
        $acl.SetOwner($object)
        $AccessRule = New-Object System.Security.AccessControl.FileSystemAccessRule("NT AUTHORITY\SYSTEM","FullControl","Allow")
        $acl.SetAccessRule($AccessRule)
        $acl.SetAccessRuleProtection($false,$true)
        $acl | Set-Acl $_.fullname
        Set-ItemProperty $acl -name IsReadOnly -value $false
        }
    

    $acl = Get-Acl C:\Windows\system32\Macromed\Flash
    $AccessRule = New-Object System.Security.AccessControl.FileSystemAccessRule("NT AUTHORITY\SYSTEM","FullControl","Allow")
    $acl.SetAccessRule($AccessRule)
    $acl | Set-Acl C:\Windows\system32\Macromed\Flash

    $acl = Get-Acl C:\Windows\system32\Macromed\Flash
    $object = New-Object System.Security.Principal.Ntaccount("NT AUTHORITY\SYSTEM")
    $acl.SetOwner($object)
    $acl | Set-Acl C:\Windows\system32\Macromed\Flash

    foreach($_ in (Get-ChildItem "C:\Windows\system32\Macromed\Flash" -recurse)){
        $acl = Get-Acl $_.fullname
        $object = New-Object System.Security.Principal.Ntaccount("NT AUTHORITY\SYSTEM")
        $acl.SetOwner($object)
        $AccessRule = New-Object System.Security.AccessControl.FileSystemAccessRule("NT AUTHORITY\SYSTEM","FullControl","Allow")
        $acl.SetAccessRule($AccessRule)
        $acl.SetAccessRuleProtection($false,$true)
        $acl | Set-Acl $_.fullname
        Set-ItemProperty $acl -name IsReadOnly -value $false
        }

    #Run the uninstall too silently
    cmd /c "C:\temp\uninstall_flash_player.exe /uninstall"

    #Remove system folders that get left behind from the uninstall tool
    Remove-Item -Path "C:\Windows\system32\Macromed\Flash" -Recurse -Force -Confirm:$false
    Remove-Item -Path "C:\Windows\SysWOW64\Macromed\Flash" -Recurse -Force -Confirm:$false

    #Get all users
    $users = Get-ChildItem -Path "C:\users\" | Select-Object -ExpandProperty name

    #Loop through all use
    foreach ($user in $users) {        
        Remove-Item -Path "C:\users\$user\AppData\Roaming\Adobe\Flash Player" -Recurse -Force -Confirm:$false
        Remove-Item -Path "C:\users\$user\AppData\Roaming\Macromedia\Flash Player" -Recurse -Force -Confirm:$false           
    }
}

#Remove the uninstall tool since we are done with it
Remove-Item -Path "C:\temp\uninstall_flash_player.exe" -Force -Confirm:$false


Tagged : / /

Add Sites to Java security exceptions list with Powershell

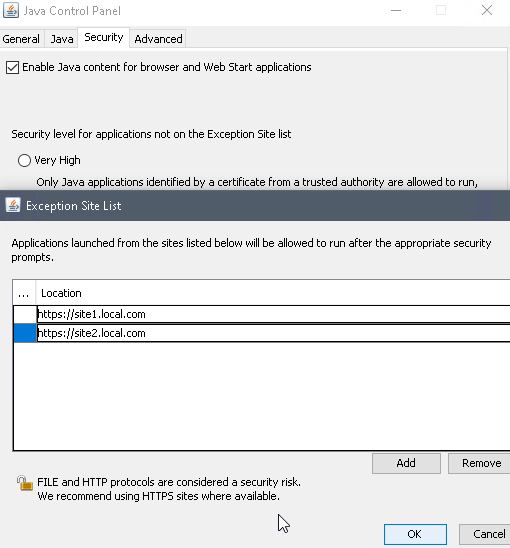
Java security exceptions are a pain. Its a setting that needs to be set for each users. You should add sites to this list sparingly but chances are that if you have any internally hosted websites that use java, one of them will need to be in the exception list. Here is a script that will add sites to java security exceptions list with powershell.

Deployment Options

The easiest way to use this script is to add to it SCCM. You can see how to do that in this post. This script can be run on a local PC as well or run on a remote PC using PSSession.

Script

The only thing for you to edit in this script is the $SiteList array. The script will read all the user folder and add the sites that are in the $SiteList array to the Java security exceptions list for each of those users.

$SiteList = @()
$SiteList = (
    "https://site1.local.com",
    "https://site2.local.com"
)

$UserFolders = Get-ChildItem -Path C:\users | select -ExpandProperty Name

foreach ($User in $UserFolders) {
    foreach ($Site in $SiteList) {
        Add-Content -Path "C:\users\$User\AppData\LocalLow\Sun\Java\Deployment\security\exception.sites" -Value "$Site"
    }    
}
Tagged : / /

Create a SCCM Device Collection by IP or Subnet

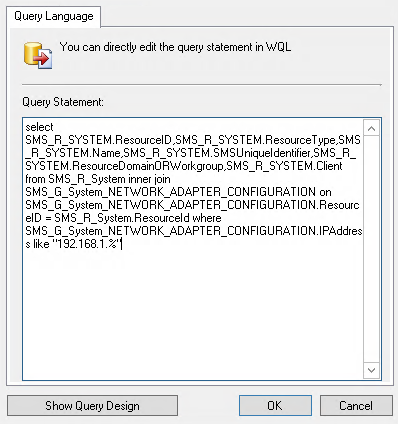
This post will show you how to create a SCCM Device Collection by IP or Subnet. This is useful for applying scripts or policies to devices that are in a particular subnet. For creating a device collection see this post. This code below is the Query Rule code you will put in your membership rules.

Query Code

Paste this code in the Show Query Language menu in your query rule. Notice the IP 192.168.1.% change this to your needs. The % is a wildcard so put that in the octet you want as a wildcard. In my example this will include any devices that have an IP in the range of 192.168.1.1-254.

select SMS_R_SYSTEM.ResourceID,SMS_R_SYSTEM.ResourceType,SMS_R_SYSTEM.Name,SMS_R_SYSTEM.SMSUniqueIdentifier,SMS_R_SYSTEM.ResourceDomainORWorkgroup,SMS_R_SYSTEM.Client from SMS_R_System inner join SMS_G_System_NETWORK_ADAPTER_CONFIGURATION on SMS_G_System_NETWORK_ADAPTER_CONFIGURATION.ResourceID = SMS_R_System.ResourceId where SMS_G_System_NETWORK_ADAPTER_CONFIGURATION.IPAddress like "192.168.1.%"

It should look something like this:

Create a SCCM device collection based on ip or subnet
Tagged : / /

Create an SCCM Collection based on software installed

It is useful to create SCCM collections for workstations or servers having a certain piece of software installed. This can help visualize just how many systems have the software install. Another thing I have used this for in the past is to help you deploy updates or vulnerability fixes to systems with that software. To create an SCCM group follow this post. Here is the query you need to put into SCCM to create an SCCM collection based on software installed.

This example is for creating a collection of systems with Flash installed. You can replace the word Flash with the name of the application you want to search for. The % signs are wildcards, I recommend keeping them but your case may vary. In your device collection’s membership rules select Query Rule. Then name your query and click Edit Query Statement.

In the next window select Show Query Language

Now Paste the below into the window that shows up (make sure to delete whatever was in there by default). Now click OK and save your collection. Don’t forget to right click your collection and click update membership!

select SMS_R_SYSTEM.ResourceID,SMS_R_SYSTEM.ResourceType,SMS_R_SYSTEM.Name,SMS_R_SYSTEM.SMSUniqueIdentifier,SMS_R_SYSTEM.ResourceDomainORWorkgroup,SMS_R_SYSTEM.Client from SMS_R_System  inner join  SMS_G_System_ADD_REMOVE_PROGRAMS  on  SMS_G_System_ADD_REMOVE_PROGRAMS.ResourceID = SMS_R_System.ResourceId  where  SMS_G_System_ADD_REMOVE_PROGRAMS.DisplayName like "%Flash%"  and  SMS_G_System_ADD_REMOVE_PROGRAMS.Version like "%" order by SMS_R_System.Name
Create SCCM collection based on software installed
Tagged : / /

Create a SCCM Device Collection

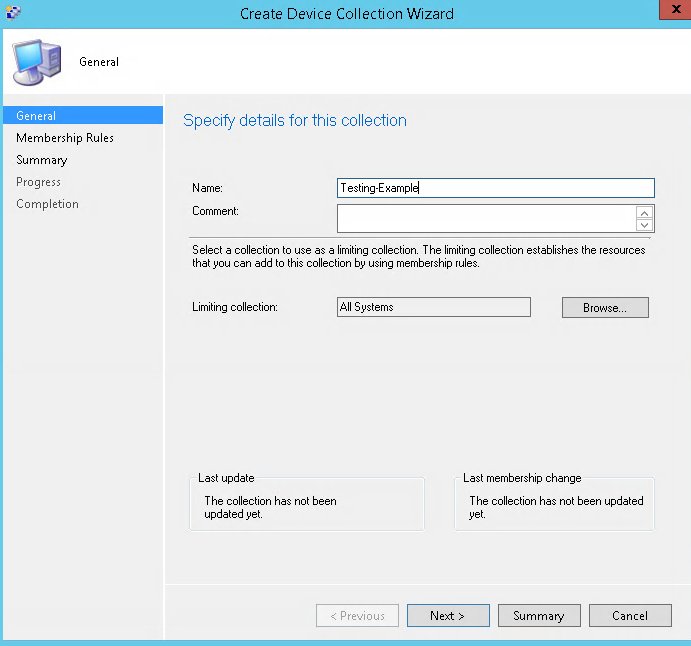
In this post I will show you how to create a SCCM device collection. Device collections are used in pretty much every other module inside SCCM. With collections you can deploy scripts, updates, assign configuration policies and more. It really is the most basic part of SCCM. I will refer back to this post often as there are MANY ways to create a device collection and in this post I just want to go over the most basic examples.

Lets get started:

In SCCM select the Assets and Compliance tab in the bottom left. Now select Device Collections in the left pane. Next, click Create Device Collection

SCCM device collections creation

You will now see the Create Device Collection Wizard in this initial window give your new collection a name and select a limiting collection. Depending on your situation and what you are trying to accomplish, you may want to select the all systems collection or one that is more specific to workstations, servers or an OU. Now click Next.

Set Membership rules

This is where things get interesting. You will notice that if you expand the Add Rule drop-down, you have a few options;

Direct Rule: Lets you select a device(s) directly based on pretty much any property of the device from name to even device owner. Lots of options here. The downfall here is its a one shot deal, you add your devices to the collection here but they never update or change.

Query Rule: This option lets you use query language to dynamically update your group based a on a schedule (default is 7 days but can be adjusted). You can find devices based on OU, subnet, part of a name, software installed, etc. The options here are limitless. I will do posts in the future showing query language examples you can use here.

Device Category Rule: This is my least favorite option. Though, that may just be because I haven’t really found a great use for it yet. With this option you can select devices that have been put into a certain category that you create. It would be things like BYOD, Company owned, Mobile device, etc. You get the idea. Could be cool, I just haven’t used it.

Include Collections: Including collections is a great way to create a larger collection holding smaller ones you have created. A good example would be if you have collections of servers in different OUs you can create a all servers collection by including all of those collections using this option.

Exclude collections: Exclude collections is just like include but excludes whatever devices are in the collection you select. This is great for making a collection of all servers EXCEPT the ones that are super important, assuming you have all of them in one collection.

The last thing to mention in this menu is the schedule at the bottom. By default the collection will update its membership every 7 days. I you would like it to update sooner, you can click Schedule… and set it to the interval you want. After you make your selections click next, review, finish. Your collection will now be created. Dont forget to right click on the new collection and then select update membership. This will populate your new collection.

Tagged : /

SCCM Script – Force Windows update from SCCM or Microsoft

Sometimes I have a server or workstation that for whatever reason I need to update outside of its scheduled maintenance window. Instead of having to RDP in and update manually I have this SCCM script. To create approve and add SCCM Scripts see this post. This script can be run directly on a workstation but it is meant to be run out of SCCM. I’ll share another version of this that can be used outside of SCCM. The magic behind this script is a module called PSWindowsupdate. Awesome module that lets you kick off updates from powershell. This will log the updates that were installed in a file on the C:\ drive names PSWindowsupdatelog-date.log. If you are “watching” this you can psremote into the endpoint and run this command to tail the log file and watch the progress:

type C:\PSWindowsupdate-date.log -wait


Script:

This one will get all available updates from Microsoft.

 try {                
            Import-Module PSWindowsupdate -ErrorAction 1 -verbose                
            }
            catch {
                Install-PackageProvider -Name NuGet -MinimumVersion 2.8.5.201 -Force
                Install-Module PSWindowsupdate -force -Confirm:$false -verbose
                Import-Module PSWindowsUpdate
            }

Import-Module PSWindowsUpdate
$updatelist = 0

$updatelist = Invoke-Command -ScriptBlock {Set-ExecutionPolicy -ExecutionPolicy Bypass -Scope Process;get-windowsupdate -WindowsUpdate -verbose}

Invoke-Command -ScriptBlock {Set-ExecutionPolicy -ExecutionPolicy Bypass -Scope Process;$date = get-date -f MM-dd-yyyy-HH-mm-ss;Invoke-WUJob -runnow -Script "Set-ExecutionPolicy -ExecutionPolicy Bypass;ipmo PSWindowsUpdate;get-windowsupdate -MicrosoftUpdate -verbose; Install-WindowsUpdate -Microsoftupdate -AcceptAll -autoreboot | Out-File C:\PSWindowsUpdate-$date.log" -Confirm:$false -Verbose} -Verbose

This one will get all the updates that have been approved through SCCM.

 try {                
            Import-Module PSWindowsupdate -ErrorAction 1 -verbose                
            }
            catch {
                Install-PackageProvider -Name NuGet -MinimumVersion 2.8.5.201 -Force
                Install-Module PSWindowsupdate -force -Confirm:$false -verbose
                Import-Module PSWindowsUpdate
            }

Import-Module PSWindowsUpdate
$updatelist = 0

$updatelist = Invoke-Command -ScriptBlock {Set-ExecutionPolicy -ExecutionPolicy Bypass -Scope Process;get-windowsupdate -verbose}

Invoke-Command -ScriptBlock {Set-ExecutionPolicy -ExecutionPolicy Bypass -Scope Process;$date = get-date -f MM-dd-yyyy-HH-mm-ss;Invoke-WUJob -runnow -Script "Set-ExecutionPolicy -ExecutionPolicy Bypass;ipmo PSWindowsUpdate;get-windowsupdate -verbose; Install-WindowsUpdate -AcceptAll -autoreboot | Out-File C:\PSWindowsUpdate-$date.log" -Confirm:$false -Verbose} -Verbose
Tagged : / / /

Powershell Install SCCM Client

There have been times where I have run into issues where the SCCM client doesn’t install on a new server or I am trying to finish a server setup quickly and I don’t want to wait for SCCM to do it automatically. Here is a little snip that will let you put a list of server or workstions into an array and it will copy the client locally and then run user powershell to install SCCM client.

Script:

#Check for Creds and ask for them if they aren't found
if (!($Creds)) {$creds = get-credential -Message "Enter your Domain Admin Creds"}

#Change this path, this should be pretty close to yours
$ClientPath = "\\SCCM_Server_Name\SMS_SITE\Client\ccmsetup.exe"

#List of Servers goes here
$servers = (
    "Server1",
    "Server2",
    "Server3" 
)

#This will clear any PSSessions
Remove-PSSession *

#Creates a PSSession for each server defined above and copies the most current client .exe locally
foreach ($server in $servers) {
    $s = New-PSSession -ComputerName $server -Credential $Creds
    Copy-Item $ClientPath -Destination "C:\ccmsetup.exe" -ToSession $s -Force
    Remove-PSSession $s
}

#Runs the client installer
$s = New-PSSession -ComputerName $servers -Credential $Creds
Invoke-Command -Session $s -ScriptBlock {
    cd C:\ ;
    .\ccmsetup.exe /mp:SCCM_Server_Name /logon SMSSITECODE=AUTO FSP=SCCM_Server_Name;
}
Tagged : / /