Squid Proxy Setup Ubuntu 20.04
Squid is a caching web proxy service. There are many reasons why you might want to setup a Proxy server but for me its mainly so I can get to certain webpages to go through my home connection rather than work. Today I want to go through the setup of using squid on an Ubuntu 20.04 server I have on my home network that I can access through a wiregaurd connection. This way I don’t have to expose the proxy server to the internet but I can pick and choose which domains I want to go over proxy. Here are the steps to get it up and running.
Step 1: Install Squid
To install run this:
sudo apt update && sudo apt install squidStep 2: Configure Squid
There are a ton of things you can do here but my needs are super basic so I will highlight what I changed. Just know if there is something you want to do and I don’t cover it, doesn’t mean it cant be done. Here is a link to the config reference for squid if you want to look into something I don’t point out here. Edit the config file:
sudo vi /etc/squid/squid.confIf you want to change the ip/port that the proxy will listen on look for look for this line
http_port 3128change it to your needs, should look like this:
http_port IP:PORT
Example:
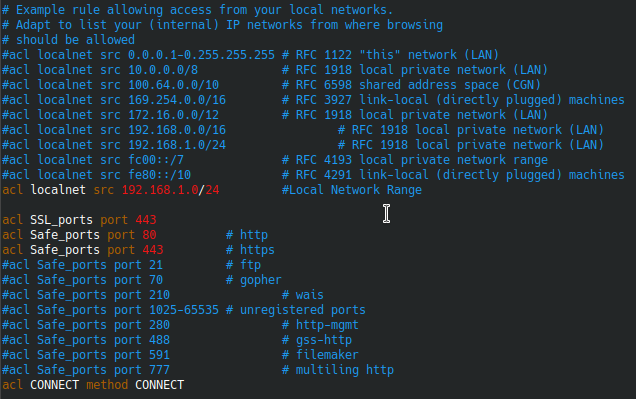
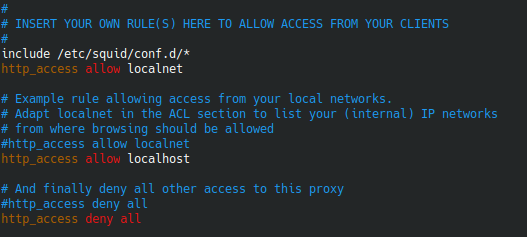
http_port 192.168.1.2:3128The acl section is where we are going to set some rules. By Default it has some example networks. Comment these out and add only the networks you want to have access to the proxy. For me I only want my local network to have access since that is where my traffic will come from. They also allow a ton of ports by default I commented out the ports I don’t want going over the proxy. If you want to block ports comment them out from this section. Here is what my section looked before making changes:
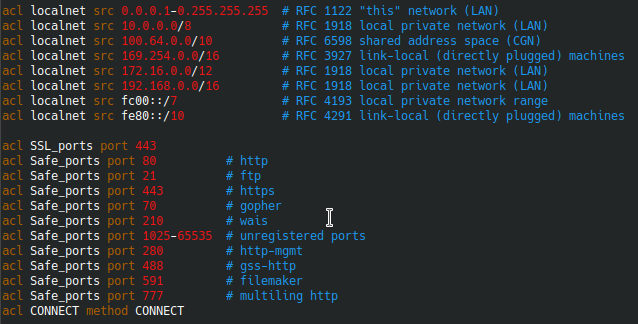
After:
Next we need to allow the localnet acl with by adding this line above http_access deny all like this:
Next setting would be DNS. On my server I have pihole setup so it IS the DNS server I want to use but if you need to change it look for the line dns_nameservers and add your dns server like this:
dns_nameservers 1.1.1.1 8.8.8.8Once you are done editing the config save and close and then run this to check the config. It should return 0:

Step 3: Start Squid and enable service
Next we start squid and enable it as a service:
sudo systemctl enable squid.service && sudo systemctl start squid.serviceThat’s it! Squid is up and running. Now to test!
Step 4: Configure Client
This is where we actually get to use the thing! There are basically two ways to use this. We can set the Whole PC or Browser to use this proxy. However, if we do that ALL http/https traffic will go over the proxy and that might not be good if using this from work or somewhere you need access to local resources as well. Another option is to use a browser extension called foxyproxy to proxy on CERTAIN URLs through the proxy. That’s the way I went so here is how to set that up.
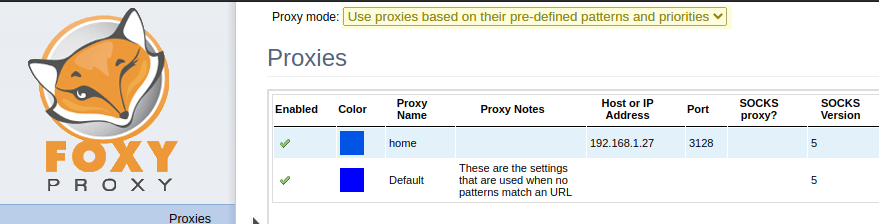
First, add the FoxyProxy standard extension to your browser (I’m using Chrome). Don’t get the basic one, it doesn’t have the ability to match URLs. Once added click the little fox logo in the top bar of chrome and click options. Now click add new proxy. Fill out your Proxy IP and port from our setup earlier. Then go to the URL Patterns tab and here you can define URLs you want to go over the proxy. Here is my example for Reddit.com

The next step is important! At the top of the options menu of FoxyProxy there is a dropdown. Change it to Use proxies based on their pre-defined patterns and priorities
Now you have a working proxy that can be used for certain domains.