This project started like most of mine do: a simple idea + a little caffeine + the dangerous confidence of “how hard can it be?” The goal? Build a wedding seating planner tool in HTML that staff at venues could use to drag and drop tables, place guests, upload floorplans—and then export the whole layout as a fillable PDF for clients.
Turns out, that “simple” idea needed a full-on interactive seating chart engine, with table logic, guest management, zoomable floorplans, and PDF generation baked in.
So I brought in a secret weapon: Codex, OpenAI’s code generation agent.
💍 The Goal: Easy Seating Planning for Weddings
We set out to create a tool that would:
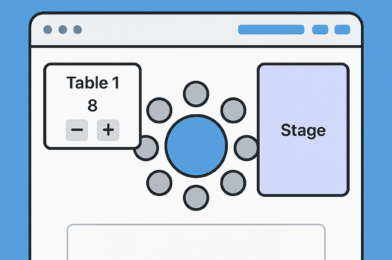
- Let staff drag and drop round or rectangular tables
- Dynamically assign and rearrange guests to seats
- Allow uploading a custom floorplan image
- Support resizing, moving, and labeling elements like stages, dance floors, and decorations
- Export the seating layout to a PDF with editable fields for guest counts and table numbers
And it needed to be:
- Fully client-side (no server needed)
- Easy enough for non-tech users
- Something I could drop into a WordPress site or share as a standalone tool
🧪 The First Version: A Bit of Chaos, but Promising
With Codex’s help, the base of the tool came together fast—HTML, CSS, and JavaScript only. But early testing uncovered a few quirky bugs:
- Tables defaulted to just two seats. Always two. Mysterious.
- Guests removed from seats would disappear entirely.
- Exports worked, but table names and seat counts couldn’t be edited after the fact.
This was the moment when I stopped “coding” and started vibe-coding: iterating rapidly by describing what I wanted in natural language, refining each interaction through short, focused prompts to Codex.
🧠 The Codex-Powered Fixes
Each feature and bug fix was fed to Codex like an AI sprint planning session:
🗣️ “When exporting to PDF, make the table number a fillable field.”
🗣️ “Add a way to import/export the layout as a JSON file.”
🗣️ “Let users name the document and use that as the export filename.”
This evolved into a pretty robust HTML-based wedding venue layout planner. Here’s a visual snapshot of how those prompts stacked up:
🧰 Under the Hood: How the Seating Chart Tool Works
The final version (v29) includes all the tools a wedding venue or planner could want:
- Add and resize tables (round or rectangular)
- Assign guests to specific seats with drag and drop
- Show/hide seats and adjust guest counts per table
- Insert venue features like dance floors, decor, and custom labels
- Zoom and pan across uploaded floorplans (Alt + drag or scroll)
- Export as PDF with fillable fields for names and seat counts
- Save or load layouts to/from
.jsonfiles for reusability
Everything’s in one HTML file. No external dependencies outside of PDF-lib and html2canvas. Drop it into a WordPress page as an iframe or host it standalone.
🧠 Lessons from Vibe-Coding with Codex
- Codex thrives on specificity. Don’t just say “make it work.” Say, “make the table resize handles invisible during PDF export.”
- UI tweaks are best done in flow. Watching Codex adjust positioning, styling, and interactivity in real time was… oddly satisfying.
- PDF-lib is legit. It handled the fillable fields like a champ once coordinates were mapped properly.
This project is a perfect example of what a drag-and-drop table planner for weddings should feel like—simple, clean, and purpose-built.
💡 What’s Next?
I’m considering wrapping this into a hosted service or plugin with client portals, saved profiles, and analytics. But for now, it’s a rock-solid planner for any wedding venue, event coordinator, or DIY couple.
If you’re building something similar, trust me: Codex can absolutely be your copilot. Just bring the vibes, some test cases, and a healthy fear of infinite loops. 😅
📌 Final Thoughts
This interactive wedding seating planner built in HTML with Codex is already getting love from venue teams. It turns chaotic guest lists into clean, printable layouts—and lets your clients edit their own info without messing up the layout.
Give it a try below!
Table Planner
Table Planner is a lightweight web-based tool for designing seating layouts. It runs entirely in the browser and requires no server setup. Open tableplanner.html in any modern browser to start arranging tables, guests and floorplan elements.
Features
- Create round or rectangular tables with adjustable seat counts
- Add stages, dance floors, decorative elements and text boxes
- Upload a custom floorplan image as the background
- Drag guests from the tray onto seats
- Toggle seat visibility when arranging the layout
- Zoom or pan the floorplan using Alt + mouse wheel / drag
- Export the plan as a fillable PDF or as a PNG image
- Save your layout to a JSON file and import it later
Usage
- Open
tableplannerusing the link below. - Use the controls at the top to add tables or other elements.
- Enter guest names and drag them onto seats.
- When finished, use Export Plan to download a PDF or Print as Image for a PNG snapshot.
- Save or import layouts via the corresponding buttons to work on them later.
Everything is handled client-side, so the page can be used offline once loaded.