Using the Yubikey for securing your login to Linux is a great step. Here is how I setup 2FA login with Yubikey on Kubuntu. Yubico actually has a pretty good guide for this here but it doesn’t show you how to make it with with KDE’ login screen (SDDM), and I use that so here is what I did to make it work. With this config my PC is setup to require a password and the Yubikey at login/lock screen and then for sudo I require ONLY the Yubikey.
Step 1: Get the Software
Download the tool:
sudo apt install libpam-u2fStep 2: Enroll Primary and Backup keys
Create the directory:
mkdir ~/.config/YubicoTo enroll primary key. Plug the primary key and run:
pamu2fcfg > ~/.config/Yubico/u2f_keysTap they Yubikey when it lights up.
Now to enroll the secondary key. Plug the backup key in and run:
pamu2fcfg -n >> ~/.config/Yubico/u2f_keysStep 3: Add to common-auth
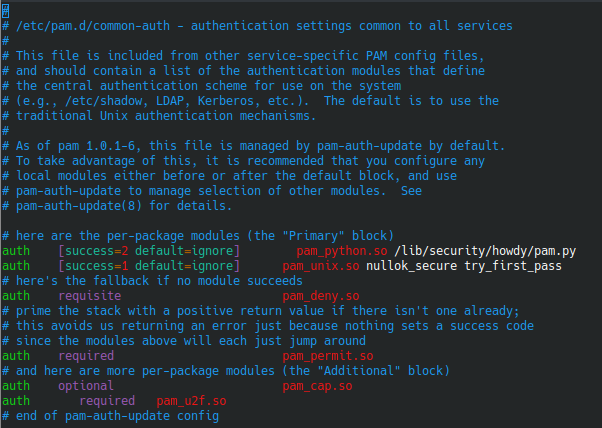
To set the Yubikey to be required for login and well anything that uses common-auth you can add this line to /etc/pam.d/common-auth
auth required pam_u2f.soI added it to the end of the file and now my common-auth file looks like this:

For me this made the login, lock and sudo all require both my password and my Yubikey. I didn’t want this for sudo so I did the next step.
Step 4: Set sudo to require Yubikey only
I wanted to be asked for JUST the Yubikey when I sudo so I changed the /etc/pam.d/sudo file by commenting out @include common-auth and added this line auth required pam_u2f.so Now the file looks like this:

Now when I run sudo I simply have to tap my Yubikey to authenticate
