SCCM Script – Force Remove Flash

Well, Flash is finally dead and you probably want to get it off all your systems. Here is a script that you can use to uninstall flash and remove all leftover folders. See my post here to learn how to create and run a script in SCCM. The script leverages the uninstall tool that adobe provides here and also removes the app data folders for each user. The only thing you need to modify in this script is the source path where you put the uninstaller. You may want to re-hash the when you download it as well just in case its different than what in the script.

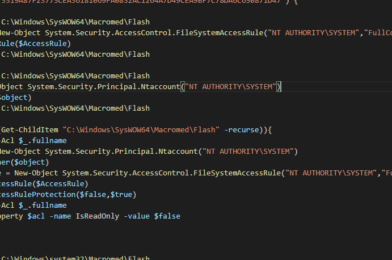
EDIT 3-19-21: I have run into additional permission issues on some PCs where, for some reason, ‘Trusted Installer’ is the owner of the Flash folders. Below is the updated script that handles this issue by giving ‘System’ ownership of the folder.

#Create a temp dir if its not already there and copy the uninstall tool 
$dir = "C:\temp"
mkdir $dir
robocopy "\\Put\Source\Path\Here"  "C:\temp" uninstall_flash_player.exe

#Get hash value of the file we just copied... JUUUUST in case
$hash_value = Get-FileHash -Path "C:\temp\uninstall_flash_player.exe"

#Compare the hash value and only run the exe if they match
if ($hash_value -eq "3319A87F23773CEA36181069FA0832AC1264A7D49CEA9BF7C78DA6C650871D47") {

    $acl = Get-Acl C:\Windows\SysWOW64\Macromed\Flash
    $AccessRule = New-Object System.Security.AccessControl.FileSystemAccessRule("NT AUTHORITY\SYSTEM","FullControl","Allow")
    $acl.SetAccessRule($AccessRule)
    $acl | Set-Acl C:\Windows\SysWOW64\Macromed\Flash

    $acl = Get-Acl C:\Windows\SysWOW64\Macromed\Flash
    $object = New-Object System.Security.Principal.Ntaccount("NT AUTHORITY\SYSTEM")
    $acl.SetOwner($object)
    $acl | Set-Acl C:\Windows\SysWOW64\Macromed\Flash

    foreach($_ in (Get-ChildItem "C:\Windows\SysWOW64\Macromed\Flash" -recurse)){
        $acl = Get-Acl $_.fullname
        $object = New-Object System.Security.Principal.Ntaccount("NT AUTHORITY\SYSTEM")
        $acl.SetOwner($object)
        $AccessRule = New-Object System.Security.AccessControl.FileSystemAccessRule("NT AUTHORITY\SYSTEM","FullControl","Allow")
        $acl.SetAccessRule($AccessRule)
        $acl.SetAccessRuleProtection($false,$true)
        $acl | Set-Acl $_.fullname
        Set-ItemProperty $acl -name IsReadOnly -value $false
        }
    

    $acl = Get-Acl C:\Windows\system32\Macromed\Flash
    $AccessRule = New-Object System.Security.AccessControl.FileSystemAccessRule("NT AUTHORITY\SYSTEM","FullControl","Allow")
    $acl.SetAccessRule($AccessRule)
    $acl | Set-Acl C:\Windows\system32\Macromed\Flash

    $acl = Get-Acl C:\Windows\system32\Macromed\Flash
    $object = New-Object System.Security.Principal.Ntaccount("NT AUTHORITY\SYSTEM")
    $acl.SetOwner($object)
    $acl | Set-Acl C:\Windows\system32\Macromed\Flash

    foreach($_ in (Get-ChildItem "C:\Windows\system32\Macromed\Flash" -recurse)){
        $acl = Get-Acl $_.fullname
        $object = New-Object System.Security.Principal.Ntaccount("NT AUTHORITY\SYSTEM")
        $acl.SetOwner($object)
        $AccessRule = New-Object System.Security.AccessControl.FileSystemAccessRule("NT AUTHORITY\SYSTEM","FullControl","Allow")
        $acl.SetAccessRule($AccessRule)
        $acl.SetAccessRuleProtection($false,$true)
        $acl | Set-Acl $_.fullname
        Set-ItemProperty $acl -name IsReadOnly -value $false
        }

    #Run the uninstall too silently
    cmd /c "C:\temp\uninstall_flash_player.exe /uninstall"

    #Remove system folders that get left behind from the uninstall tool
    Remove-Item -Path "C:\Windows\system32\Macromed\Flash" -Recurse -Force -Confirm:$false
    Remove-Item -Path "C:\Windows\SysWOW64\Macromed\Flash" -Recurse -Force -Confirm:$false

    #Get all users
    $users = Get-ChildItem -Path "C:\users\" | Select-Object -ExpandProperty name

    #Loop through all use
    foreach ($user in $users) {        
        Remove-Item -Path "C:\users\$user\AppData\Roaming\Adobe\Flash Player" -Recurse -Force -Confirm:$false
        Remove-Item -Path "C:\users\$user\AppData\Roaming\Macromedia\Flash Player" -Recurse -Force -Confirm:$false           
    }
}

#Remove the uninstall tool since we are done with it
Remove-Item -Path "C:\temp\uninstall_flash_player.exe" -Force -Confirm:$false


Tagged : / /

SCCM Script – Visual C++ Redistributable updater

While windows update will update the VCRedist packages you have installed it will not remove the old versions. Here is a script that can be used from the SCCM scripts section. To create approve and add SCCM Scripts see this post. The script will first check to see if chocolatey is installed and will attempt to install it if not found. After that as long as chocolatey was installed successfully it will move on to looking for installs of VCRedist and will uninstall all versions found and use chocolatey to install the latest version (it will install both x64 and x86). See comments in code for a few details like where you can add or remove versions to look for.

#Start checking for Chocolatey
try {
	invoke-command -scriptblock {choco} -erroraction stop
    write-host "Has Choco. all is good!"
    $Choco_installed = $true
}

catch {
	Write-Host "Needs Choco.  Trying install..." 
	try {
		invoke-command -scriptblock {Set-ExecutionPolicy Bypass -Scope Process -Force; Invoke-Expression ((New-Object System.Net.WebClient).DownloadString('https://chocolatey.org/install.ps1'))} -ErrorAction Stop
        $Choco_installed = $true
    }
	catch {
        write-host "Install Failed"
        $Choco_installed = $false
	}
		
}
Set-ExecutionPolicy -ExecutionPolicy Bypass -Scope Process -force;


#Checks to see if the above was successful
if ($Choco_installed -eq $true) {
    #this is where you can set the versions of VCRedist to look for
    $VCredistVersions = @()
    $VCredistVersions = (
        "2005",
        "2008",
        "2010",
        "2013",
        "2015",
        "2019"
    )

#Loop through each version
    foreach ($Version in $VCredistVersions) {
        if (get-wmiobject -Class Win32_Product| where {$_.name -like "*Microsoft Visual C++ $Version Redistributable*"}| select name,localpackage) {
            Write-Host "Found Microsoft Visual C++ $version Redistributable.  Removing old versions and installing latest..." -ForegroundColor Yellow
            $Packages = get-wmiobject -Class Win32_Product| where {$_.name -like "*Microsoft Visual C++ $Version Redistributable*"}| select name,localpackage -ErrorAction Stop
                    foreach ($Package in $Packages) {
                        $packagename = $Package.localpackage    
#Run the actual uninstall                        
cmd.exe /c "msiexec /x $packagename /qn"
                        Write-Host "Successfully uninstalled $packagename!" -ForegroundColor Green
                    }
                    #Install latest version
                    choco update vcredist$version -y -f
        } 
    }
}
Tagged : / / /

Powershell Connection Examples

In this post I’m going to show you a few different ways to connect to thing using Powershell. I will make other posts that go into more detail and explain each one but this is more of a reference post. I will probably update this post in the future to include more but this current list includes Powershell Connection Examples for: Active Directory (on-prem), AzureAD, Exchange (on-prem), Exchange Online, vCenter and SCCM. Like all my posts I’m not claiming these are the only ways but these are the ways I use and they work. For these you may need to set you execution policy for these to work:

Set-ExecutionPolicy -ExecutionPolicy Bypass
Active Directory (On-Prem)
#set Variable for which Domain Controller to connect to
$Domain_Controller = "MyDC1"

#Check for Creds and ask for them if they aren't found
if (!($Creds)) {$Creds = get-credential -Message "Enter your Domain Admin Creds"}

#Connect to Domain Controller and import a Active Directory Session
$session = New-PSSession -ComputerName $Domain_Controller -Credential $creds
Invoke-Command $session -Scriptblock { Import-Module ActiveDirectory }
Import-PSSession -Session $session -module ActiveDirectory

Test Command

Get-ADuser username
Example of Active Directory Connection with Powershell
AzureAD (MSOL)

For this you need to have the the MSOnline module installed you can get it by running:

Install-Module MSOnline -verbose

There are two ways to run this and it depends on if you have MFA setup and Trusted locations:
Option 1 –
If you do NOT have MFA setup OR you have MFA setup but you are logging in from a “Trusted Location”

#Check for Creds and ask for them if they aren't found
if (!($365Creds)) {$365Creds = get-credential -Message "Enter your Office365 Admin Creds"}

#Make the connection
Connect-MsolService -Credential $365Creds

Option 2 – If you have MFA on and aren’t at a “Trusted Location”

Connect-MsolService


Test Connection

Get-MsolUser -UserPrincipalName [email protected]
Example of Azure AD Connection with Powershell
Exchange (On-Prem)
#Set Exchange Server Name
$Exc_Server = "ExchangeServerName"

#Check for Creds and ask for them if they aren't found
if (!($Creds)) {$Creds = get-credential -Message "Enter your Domain Admin Creds"}

$Session = New-PSSession -ConfigurationName Microsoft.Exchange -ConnectionUri http://$Exc_Server/PowerShell/ -Authentication Kerberos -Credential $creds

Import-PSSession $Session

Test Command

Get-Mailbox username
Example of Exchange Connection with Powershell
Exchange Online

For this you need the ExchangeOnlineManagement module installed. To install it run:

Install-Module ExchangeOnlineManagement

To connect use this:

Connect-ExchangeOnline

Test Command:

Get-Mailbox [email protected]
Example of Exchange Online Connection with Powershell
vCenter

For this you need the VMwarePowercli module installed. to install run:

Install-Module VMware.PowerCLI -AllowClobber

To connect:

If you do not have an SSL certificate on your vCenter you will need to set it to ignore your self signed cert with

Set-PowerCLIConfiguration -InvalidCertificateAction ignore

Next set your vCenter server with this command. Change vCenterServerName to match your vCenter server

#Set vCenter Servername
$vCenter_Server = "vCenterServerName"

Here is the actual connection commands, not need to change anything here. It will bring up a credential box. Enter your vCenter creds in domain\username format.

#Check for Creds and ask for them if they aren't found
if (!($Creds)) {$Creds = get-credential -Message "Enter your vCenter Admin Creds in domain\username format"}

Connect-VIServer -server $vCenter_Server -Credential $creds

Test Command:

get-Cluster
Example of vCenter Connection with Powershell
SCCM

The last Powershell Connection Example I have for you is SCCM. For this one you need to have the SCCM console installed locally or run this from the SCCM server. The console is specific to the version of SCCM you are running, you can get the console install from here \\SCCMSERVERNAME\SCCMConsoleInstaller\consoleinstaller.exe

To connect:

There are a few things to change in the below. Change SITENAME to your SCCM site name in both places, and change SCCM_Server_Name with your SCCM server name.

#Check for Creds and ask for them if they aren't found
if (!($Creds)) {$Creds = get-credential -Message "Enter your Domain Admin Creds"}

Import-Module 'C:\Program Files (x86)\Microsoft Configuration Manager\AdminConsole\bin\ConfigurationManager.psd1'
New-PSDrive -Credential $Creds -Name "SITENAME" -PSProvider "AdminUI.PS.Provider\CMSite" -Root "SCCM_Server_name" -Description "Primary site"
Set-Location SITENAME:

Test command:

Get-CMSite
Example of SCCM Connection with Powershell
Azure

Connecting to Azure is similar to AzureAD or Exchange online. First, you need the module. Once it is installed, you can now connect. One important thing to note is this AZ module is newer. If you have used the Azure or AzureRM modules in the past you need to remove them with uninstall-module.

Uninstall AzureRM:

Uninstall-AzureRm

Install Module:

 Install-Module az -AllowClobber

Once the module is install you can now connect.

Connect to Azure:

Connect-AzAccount

This will open another window where you can sign into Azure using your credentials.

Test Command:

Get-AzSubscription
Azure Connection Example
Tagged : / / / /