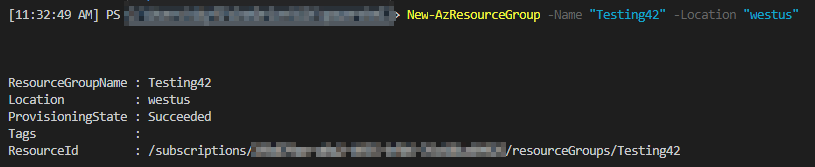
In a previous post I showed you how to create a resource group. The next thing I want to show you is how to create a vnet, subnet and a network security group with application security rules built in. This will result in a new network where we can place VMs or other objects. I am going to break down each section of this script and explain what is happening. At the end, I will put it all together so you can tweak it and use in your own environment.
Variables
This is the section you will change to fit your resource group, location and subnet preferences.
### Change these to your liking
$LocationName = "westus"
$ResourceGroupName = "Skylar-Testing"
$VnetAddressPrefix = "10.50.0.0/24"
$SubnetAddressPrefix = "10.50.0.0/24"

### Change these only if you don't like my naming convention
$NetworkName = "$ResourceGroupName-vnet"
$SubnetName = "$ResourceGroupName-subnet"
Create Application Security Groups
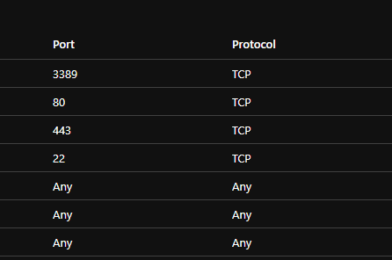
Application security groups are what you will use to define allow/deny rules based on ports for your VMs. In my example I make 3 groups;
Management-Linux
– I will use this group to attach a rule to allow SSH (Port 22) traffic.
Management-Windows
– I will use this group to attach a rule to allow RDP (Port 3389) traffic.
Web
– I will use this group to attach a rule to allow Web (Ports 80, 443) traffic.
### Create Application security Groups if they dont already exist
try {
    $asgLinux = get-AzApplicationSecurityGroup -Name "Management-Linux" -ResourceGroupName $ResourceGroupName -ErrorAction Stop
}
catch {
    $asgLinux = New-AzApplicationSecurityGroup -Name "Management-Linux" -Location $LocationName -ResourceGroupName $ResourceGroupName
}
try {
    $asgWindows = get-AzApplicationSecurityGroup -Name "Management-Windows" -ResourceGroupName $ResourceGroupName -ErrorAction Stop
}
catch {
    $asgWindows = New-AzApplicationSecurityGroup -Name "Management-Windows" -Location $LocationName -ResourceGroupName $ResourceGroupName
}
try {
    $asgWeb = get-AzApplicationSecurityGroup -Name "Web" -ResourceGroupName $ResourceGroupName -ErrorAction Stop
}
catch {
    $asgWeb = New-AzApplicationSecurityGroup -Name "Web" -Location $LocationName -ResourceGroupName $ResourceGroupName
}
These are just the groups I am making, your needs may vary and in the next section you will see where the actual rules come into play.
Create Network Security Group (NSG) and apply rules
Here is where we create the actual nsg and apply rules to it. Your rules may vary but I think this is a good start. You might notice that the priority of each rule is set 10 apart. This allows us to add rules in between these few defaults. That way we can override one of these with a rule for a specific situation and put the priority lower than the more strict default rule. Another thing to note on the two management rules. In the code for this example I have the SourceAddresssPrefix set to Internet. This is not best practice for an actual production environment. Ideally you just use this for testing or better yet scope it down to your public IP. It would look something like 0.0.0.0/32 where the 0’s would be your public IP. You can get that easily here.
### Check to see if the NSG already exists and creates if not
try {
    $nsg = get-AzNetworkSecurityGroup -ResourceGroupName $ResourceGroupName -Name "$NetworkName-NSG" -ErrorAction Stop
}
catch {
    ### Security Group rules
    $RDP_Rule = New-AzNetworkSecurityRuleConfig -Name rdp-rule -Description "Allow RDP" `
    -Access Allow -Protocol Tcp -Direction Inbound -Priority 100 `
    -SourceAddressPrefix Internet -SourcePortRange * `
    -DestinationApplicationSecurityGroup $asgWindows -DestinationPortRange 3389

    $HTTP_Rule = New-AzNetworkSecurityRuleConfig -Name http-rule -Description "Allow HTTP" `
    -Access Allow -Protocol Tcp -Direction Inbound -Priority 110 `
    -SourceAddressPrefix Internet -SourcePortRange * `
    -DestinationApplicationSecurityGroup $asgWeb -DestinationPortRange 80

    $HTTPS_Rule = New-AzNetworkSecurityRuleConfig -Name https-rule -Description "Allow HTTPS" `
    -Access Allow -Protocol Tcp -Direction Inbound -Priority 120 `
    -SourceAddressPrefix Internet -SourcePortRange * `
    -DestinationApplicationSecurityGroup $asgWeb -DestinationPortRange 443

    $SSH_Rule = New-AzNetworkSecurityRuleConfig -Name ssh-rule -Description "Allow SSH" `
    -Access Allow -Protocol Tcp -Direction Inbound -Priority 130 `
    -SourceAddressPrefix Internet -SourcePortRange * `
    -DestinationApplicationSecurityGroup $asgLinux -DestinationPortRange 22

    ### Create Network Security Group
    $nsg = New-AzNetworkSecurityGroup -ResourceGroupName $ResourceGroupName -Location $LocationName -Name "$NetworkName-NSG" -SecurityRules $RDP_Rule,$SSH_Rule,$HTTP_Rule,$HTTPS_Rule

}
Create vnet and subnet
Now that we have our asg’s and nsg we can create the vnet and associate it with what we created above. This is probably the shortest most straight forward section, but it couldn’t exist without the stuff we just did. Well it could, just wouldn’t have any security and we don’t want that! This section will check and make sure the vnet doesn’t already exist and then it uses all the info from above to create the vnet and the subnet inside. You shouldn’t have to edit this section.
#Check for Network and create if it does not exist
try {
    Get-AzResourceGroup $ResourceGroupName | Get-AzVirtualnetwork -Name $NetworkName -ErrorAction Stop
    Write-Host "Network exists!" -ForegroundColor DarkGreen
}
catch {
    Write-Host "Network does not exist.  It will now be created." -ForegroundColor DarkRed
    ### Create vnet and subnet
    $SingleSubnet = New-AzVirtualNetworkSubnetConfig -Name $SubnetName -AddressPrefix $SubnetAddressPrefix -NetworkSecurityGroup $nsg -ErrorAction Stop
    $Vnet = New-AzVirtualNetwork -Name $NetworkName -ResourceGroupName $ResourceGroupName -Location $LocationName -AddressPrefix $VnetAddressPrefix -Subnet $SingleSubnet -ErrorAction Stop
    Write-Host "Completed!" -ForegroundColor DarkGreen
}
Put it all together
Here is the script in its entirety. Hopefully the explanation helped. This was kind of weird the first few times I did it.
$LocationName = "westus"
$ResourceGroupName = "Testing42"
$NetworkName = "$ResourceGroupName-vnet"
$VnetAddressPrefix = "10.50.0.0/24"
$SubnetName = "$ResourceGroupName-subnet"
$SubnetAddressPrefix = "10.50.0.0/24"


### Create Application security Groups if they dont already exist
try {
    $asgLinux = get-AzApplicationSecurityGroup -Name "Management-Linux" -ResourceGroupName $ResourceGroupName -ErrorAction Stop
}
catch {
    $asgLinux = New-AzApplicationSecurityGroup -Name "Management-Linux" -Location $LocationName -ResourceGroupName $ResourceGroupName
}
try {
    $asgWindows = get-AzApplicationSecurityGroup -Name "Management-Windows" -ResourceGroupName $ResourceGroupName -ErrorAction Stop
}
catch {
    $asgWindows = New-AzApplicationSecurityGroup -Name "Management-Windows" -Location $LocationName -ResourceGroupName $ResourceGroupName
}
try {
    $asgWeb = get-AzApplicationSecurityGroup -Name "Web" -ResourceGroupName $ResourceGroupName -ErrorAction Stop
}
catch {
    $asgWeb = New-AzApplicationSecurityGroup -Name "Web" -Location $LocationName -ResourceGroupName $ResourceGroupName
}


### Check to see if the NSG already exists and creates if not
try {
    $nsg = get-AzNetworkSecurityGroup -ResourceGroupName $ResourceGroupName -Name "$NetworkName-NSG" -ErrorAction Stop
}
catch {
    ### Security Group rules
    $RDP_Rule = New-AzNetworkSecurityRuleConfig -Name rdp-rule -Description "Allow RDP" `
    -Access Allow -Protocol Tcp -Direction Inbound -Priority 100 `
    -SourceAddressPrefix Internet -SourcePortRange * `
    -DestinationApplicationSecurityGroup $asgWindows -DestinationPortRange 3389

    $HTTP_Rule = New-AzNetworkSecurityRuleConfig -Name http-rule -Description "Allow HTTP" `
    -Access Allow -Protocol Tcp -Direction Inbound -Priority 110 `
    -SourceAddressPrefix Internet -SourcePortRange * `
    -DestinationApplicationSecurityGroup $asgWeb -DestinationPortRange 80

    $HTTPS_Rule = New-AzNetworkSecurityRuleConfig -Name https-rule -Description "Allow HTTPS" `
    -Access Allow -Protocol Tcp -Direction Inbound -Priority 120 `
    -SourceAddressPrefix Internet -SourcePortRange * `
    -DestinationApplicationSecurityGroup $asgWeb -DestinationPortRange 443

    $SSH_Rule = New-AzNetworkSecurityRuleConfig -Name ssh-rule -Description "Allow SSH" `
    -Access Allow -Protocol Tcp -Direction Inbound -Priority 130 `
    -SourceAddressPrefix Internet -SourcePortRange * `
    -DestinationApplicationSecurityGroup $asgLinux -DestinationPortRange 22

    ### Create Network Security Group
    $nsg = New-AzNetworkSecurityGroup -ResourceGroupName $ResourceGroupName -Location $LocationName -Name "$NetworkName-NSG" -SecurityRules $RDP_Rule,$SSH_Rule,$HTTP_Rule,$HTTPS_Rule

}

#Check for Network and create if it does not exist
try {
    Get-AzResourceGroup $ResourceGroupName | Get-AzVirtualnetwork -Name $NetworkName -ErrorAction Stop
    Write-Host "Network exists!" -ForegroundColor DarkGreen
}
catch {
    Write-Host "Network does not exist.  It will now be created." -ForegroundColor DarkRed
    ### Create vnet and subnet
    $SingleSubnet = New-AzVirtualNetworkSubnetConfig -Name $SubnetName -AddressPrefix $SubnetAddressPrefix -NetworkSecurityGroup $nsg -ErrorAction Stop
    $Vnet = New-AzVirtualNetwork -Name $NetworkName -ResourceGroupName $ResourceGroupName -Location $LocationName -AddressPrefix $VnetAddressPrefix -Subnet $SingleSubnet -ErrorAction Stop
    Write-Host "Completed!" -ForegroundColor DarkGreen
}